Adding brake power booster - ckhorne's 1967 project

Won't run? Engine, cooling system, fuel pump, carb, clutch, tranny, brakes, etc. The old messages from the NPCA 'Engine & Mechanical' category are here.

Postby ckhorne » Sun Nov 15, 2015 7:33 pm

It's been a while since I've been able to work on the Patrol, but I've finally finished up with another small project on it that I'd post about. I know others have done this, but I wanted to a more complete writeup, in case someone digs this post up in the future...

The Patrol brakes have always been... sketchy. I have a single master cylinder serving all 4 wheels, and my patrol doesn't have an emergency brake. So I have zero redundancy, and using the brakes has always required a hefty foot. Some may call this "character"... I call it nerve racking.

I started looking into what it'd take to upgrade the master cylinder to a dual cylinder system. Both dual cylinder options and bore size has been discussed elsewhere, but as I was looking at my options, I realized that I could go with a vacuum boosted system for about $100 more. So... since I'm already departing from stock, I decided go for a dual master / boosted setup.

The first check was to confirm that the Patrol has enough vacuum to support a boosted system. I spent a whole night just tracking down an adapter needed for the header port (#4 in the following picture):

60-006-01.jpg


For the record, it's a 9/16"-18 thread. I ultimately needed a 3/8" diameter vacuum hose, and finally found this on amazon, which works perfectly.

Hooked up to a vacuum gauge, I'm pulling ~21 in-Hg at idle, and up to 27 during driving - plenty for booster needs.

IMG_2409.JPG
You do not have the required permissions to view the files attached to this post.
ckhorne Offline

User avatar
You know you own a Patrol when…
 
Posts: 190
Joined: Wed Jan 01, 2014 2:14 pm
Has thanked: 49 times
Been thanked: 141 times
Location: Atlanta, GA, USA

Postby ckhorne » Sun Nov 15, 2015 7:56 pm

Next up was tracking down exactly which master / booster combo I wanted. I ended up going with a Tuff Stuff 2122NB-1 booster combo and 2301NA proportioning valve:

Image

It's a dual master cylinder, dual 7" diaphragm assembly. I got mine from Summit Racing, but they sell them other places.

I really had no idea what size booster would be best for the Patrol. More isn't always better, since too much would require a very light foot. I found this chart:

2015-11-15_19-46-38.jpg


which shows that a dual 7" should provide about 70% additional force from the vacuum, but in the end, had to take a guess on what would work best. The 2122 is a 1" bore with 3/8"-24 ports, to keep everything the same and make the conversion a little easier. I actually bought a dual 8" as well, but it looked like it'd be too big to make work. Speaking of big, the difference in size between the original and new master is shocking. In the end, it's still a 1" bore, but this thing is massive...

I had a bracket made that would mount the new master onto the firewall where the previous master was. It took a bunch of trial and error using the booster to cut out some of the engine bay sheet metal.

IMG_2500.JPG


The final positioning looked remarkably "factory":

IMG_2502.JPG


I did have to move the proportioning valve to the other side, which required some hammering of the bracket and bending of the connecting brake lines.
You do not have the required permissions to view the files attached to this post.
ckhorne Offline

User avatar
You know you own a Patrol when…
 
Posts: 190
Joined: Wed Jan 01, 2014 2:14 pm
Has thanked: 49 times
Been thanked: 141 times
Location: Atlanta, GA, USA

Postby ckhorne » Sun Nov 15, 2015 8:21 pm

I replaced all the stock front brake lines with stainless steel lines (I went the easy route and bought SS lines with the ends already flared). The proportioning valve has separate runs for left front, right front, and rear brakes. Originally I had planned to trace the original route for the fronts, until I realized I could get away with less line and without another 16" of flexible hose (between frame and axle. I made some brackets near the top shock mounts and ran the existing flexible line to that bracket, and then from the proportioning valve to the bracket. Simple and clean.

IMG_2661.JPG


I used a basic pedal rod extension. I bought this, hoping the bracket would be usable, but in the end, I only used the extension rod.

And after painting, bending lines, and bleeding all the lines (oh it sounds so easy when I just type it out like that... :doh:
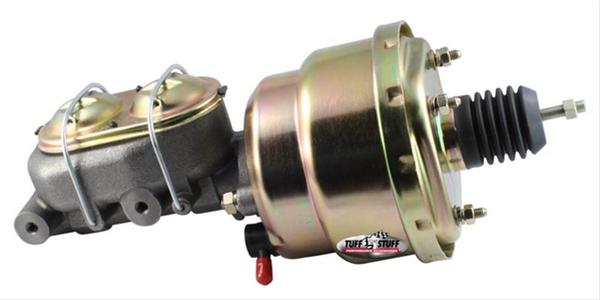
), I end up with the final product:

IMG_2659.JPG


Word to the wise: Buy some master cylinder paint (like this) and paint your master cylinder *before* you assemble anything. I didn't even consider this, and after just 3 days, my master was fully rusted over. I didn't want to remove the lines and go through re-bleeding everything, so I had to paint it in place. What a pain. Also note that brake fluid and metal etch will remove the zinc plating. Just... paint before installing. Trust me. :(


So... how does it work? Almost too well. It takes very little pedal to stop. If anything, I think I have too much boost, but I'm not ripping it out now. If I had to do it over again, I'd probably go with a single 7" diaphragm (a Tuff Stuff 2121NB-1, for those taking notes) instead. I don't have that much feedback from the brake pedal itself until I get pretty far down in the travel; I also don't know if this is just how a boosted 4-wheel drum brakes setup will feel.

And even though I bled the master, the master + proportioning valve and then each wheel multiple times over multiple nights using multiple tools (gravity bleeding, the old fashion way, vacuum bleeder, pressure bleeder), and the pedal is stiff at around 60-70% of throw, it still feels like it may have some air left in the lines. And it pulls a bit to the right during heavy braking. I'm open to ideas or comments... I wonder at this point if the pulling is related to suspension or caster/camber setup...

In the end, I'm really happy with the upgrade. I can actually stop without sweat beading up on my forehead, and I know that I've got front/rear redundancy. The proportioning valve has a switch that can be wired up to a light on the dash that indicates a major brake pressure malfunction; I may be wiring that just to have a little more peace of mind.
You do not have the required permissions to view the files attached to this post.
ckhorne Offline

User avatar
You know you own a Patrol when…
 
Posts: 190
Joined: Wed Jan 01, 2014 2:14 pm
Has thanked: 49 times
Been thanked: 141 times
Location: Atlanta, GA, USA

Postby moore_rb » Mon Nov 16, 2015 8:27 am

That's great work, and a great writeup !

Good info on the dual versus single diaphragm booster- I think way back when I was researching power brakes for my 66, I was considering a single diaphragm 7 inch booster as well.
Of course, all those notes went bye-bye the second I started disassembling the 66 to be a parts-donor... :doh:
ImageImageImageImage

L-R:
White 65 Hardtop L60-3-00617 (undergoing restoration)
Red 65 hardtop 4L60-002565 (scrapped for parts)
66 Hardtop "El-Bondo Patrol", L60-00511 (Restored, then sold June2020)
Blue 67 Hardtop (sold March1997)
Green 62 Softtop L60-2-00504 (undergoing restoration)
moore_rb Offline

User avatar
Administrator
Administrator
 
Posts: 2460
Images: 70
Joined: Wed Jul 03, 2013 11:49 pm
Location: Arizona
Has thanked: 814 times
Been thanked: 1291 times
Location: Arizona

Postby RiverPatrol » Mon Nov 16, 2015 10:08 am

Looks great and awesome write up. That's some nice work there.

The sponginess and pulling you're feeling could simply be adjustment of the brake shoes. Adjustment is pretty critical for the brakes to work right. They should be just tight enough that the wheel won't turn a full revolution when spun.
Beyond any hope for intervention

Image
RiverPatrol Offline

User avatar
Administrator
Administrator
 
Posts: 7435
Images: 959
Joined: Thu Oct 04, 2012 10:42 am
Has thanked: 6777 times
Been thanked: 2290 times
Location: Temecula, CA

Postby ckhorne » Mon Nov 16, 2015 10:11 am

RiverPatrol wrote:The sponginess and pulling you're feeling could simply be adjustment of the brake shoes. Adjustment is pretty critical for the brakes to work right. They should be just tight enough that the wheel won't turn a full revolution when spun.


I had adjusted them to where there was just a little bit of drag, but I wonder if driving a little bit has bedded them slightly, causing what you're talking about. I'll try adjusting them a little more.
ckhorne Offline

User avatar
You know you own a Patrol when…
 
Posts: 190
Joined: Wed Jan 01, 2014 2:14 pm
Has thanked: 49 times
Been thanked: 141 times
Location: Atlanta, GA, USA

Postby RiverPatrol » Mon Nov 16, 2015 10:20 am

New shoes will need re-adjusting frequently as they wear in/seat in. You'll probably find they they aren't as tight as they were when you adjusted them before.
Beyond any hope for intervention

Image
RiverPatrol Offline

User avatar
Administrator
Administrator
 
Posts: 7435
Images: 959
Joined: Thu Oct 04, 2012 10:42 am
Has thanked: 6777 times
Been thanked: 2290 times
Location: Temecula, CA

Postby ckhorne » Mon Nov 16, 2015 10:39 am

ckhorne wrote:Hooked up to a vacuum gauge, I'm pulling ~21 in-Hg at idle, and up to 27 during driving - plenty for booster needs.

IMG_2409.JPG


You know, it didn't occur to me until I re-read my own post. I wonder if I'm reading my vacuum gauge correctly. The meter says in-Hg, not PSI. 21 in-Hg, which equals 10.3 PSI. This doesn't really change the fact that it's working, but it'd be good to figure out before someone else goes down this road. I'll read the instruction manual tonight to see if I can get a clearer answer...


OK - Ignore this. Looking yet again, I see that the *vacuum* required is measured in in-Hg, requiring ~18+ in-Hg. The *brake line pressure* is measured in psi (boosting from 891 to 1515 psi in my example). Sorry for the confusion-
ckhorne Offline

User avatar
You know you own a Patrol when…
 
Posts: 190
Joined: Wed Jan 01, 2014 2:14 pm
Has thanked: 49 times
Been thanked: 141 times
Location: Atlanta, GA, USA

Postby Esteban » Mon Nov 16, 2015 1:06 pm

Excellent write up. Congratulations on your efforts, since the final product looks tops. :clap: :clap: :clap:

The administrators will have to put this portion of your thread as a separate one and made it a sticky. It provides a comprehensive guide for anyone tackling this project. Thanks!

After reading about your 7" dual, I wanted to compare with what I have. From pictures that I have at the office, I'm running a single 7" dia. booster. No wonder grandma can brake on yours, but my guess is that the feel is not much different from what you have in modern cars, so it will be ok.

The vacuum you have at idle is really good, and about one inch more than what I'm normally getting (I had a permanent vacuum gauge installed). Regarding the pull of the brake, the comments from RiverPatrol are right on. Give it some time.

My only observation will be regarding installing the flex hoses directly from the chassis to each wheel, since these are the points with the more travel and abuse.
Owner of the same Patrol since 1967
Esteban Offline

User avatar
Patrol Fanatic!
Patrol Fanatic!
 
Posts: 2853
Joined: Sat Feb 23, 2013 11:28 am
Location: Lutherville, MD
Has thanked: 5568 times
Been thanked: 1435 times
Location: Lutherville, MD

Postby ckhorne » Mon Nov 16, 2015 3:05 pm

Esteban wrote:The administrators will have to put this portion of your thread as a separate one and made it a sticky. It provides a comprehensive guide for anyone tackling this project.


Thanks!
I had debated posting this separately, but wasn't sure it'd be helpful enough for anyone else. Originally I tried to have my bracket made by eMachineshop.com, so that it'd be a simple parts list for anyone wanting to do the upgrade, but I couldn't make that happen (the software was overkill for the bracket).


My only observation will be regarding installing the flex hoses directly from the chassis to each wheel, since these are the points with the more travel and abuse.


I'm a little concerned about that as well - I positioned the brackets to try to reduce the strain on the hoses as much as possible, but that still may be too much. I'm going to keep an eye on them, and will report back here if my setup fails prematurely.
ckhorne Offline

User avatar
You know you own a Patrol when…
 
Posts: 190
Joined: Wed Jan 01, 2014 2:14 pm
Has thanked: 49 times
Been thanked: 141 times
Location: Atlanta, GA, USA

Next

Return to Engine and Mechanical

Who is online

Users browsing this forum: No registered users and 2 guests