69 rat house

Rust or bling, we want to see it!

Postby nizmut » Fri Feb 17, 2017 12:46 am

So the storm passed through early and the driveway dried out so I did a little work. The goal was to have the front dif in the shop by dark because another storm is supposed to hit in the morning.
So first I had to clean up a space to move all the parts from the right side to on the bench. Then clear a section in the middle of the shop for the dif. Then Haul all the tools out to the Patrol once the concrete mostly dried up.
After getting ready, and double standing the right side because it was all ready taken back to the axle housing(yes I have had jackstands fail before, and a friends brother was killed by jackstands failing), I disconnected the right shock, sway bar, sway bar end link, both stearing stabilizers, and droop stop. Then with the left tire still on I rolled under the patrol and did the same on the left side plus the main brake line and tie rod from the pitman arm. Then I removed the left tire and ball joint so I could haul the tie rods into the shop. I had removed the front drive shaft a Sunday afternoon so that was all ready out. Then with both sides on double stands I removed the u-bolts and straight bolts holding the axle housing to the springs. At this point I put stands under the axle and pulled the front shackles.
20170216_175338 (Medium).jpg

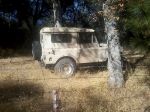
Got all the tools picked up and the axle slid out right at dusk. That thing is a heavy pig to get out of there by your self. But in the shop before dark :)
20170216_183319 (Medium).jpg
You do not have the required permissions to view the files attached to this post.
Robin
nizmut Offline

User avatar
You know you own a Patrol when…
 
Posts: 214
Images: 0
Joined: Sun Nov 10, 2013 8:41 pm
Has thanked: 81 times
Been thanked: 173 times
Location: Vallejo, Ca, USA

Postby nizmut » Tue Feb 21, 2017 1:03 am

Quick locking hub rebuild. I didn't document the disassembly, but will point out the one catch.
Here are all the parts cleaned up
20170220_183922 (Medium).jpg


And here are the o-rings I used for the rebuild
20170220_184536 (Medium).jpg

The middle sized one is a v seal on the hubs, but I replaced it with a o-ring because sourcing became a pain.

The small and middle sized o-rings go on the brass dial adding a little lube as you go.
20170220_185006 (Medium).jpg


Then you flip the dial over and push it in the outer housing.
Then you flip the housing over and set the thin plate over the end of the brass dial, lining up the holes.
20170220_185234 (Medium).jpg

20170220_185351 (Medium).jpg


Now the threaded cup with the pin at the top left gets a little lube on it and threads into the gear at the bottom left. Then orient the the pin on the center piece and the dowel hole on the ring gear so the threads are flush on the inside with the dial in the locked position.
20170220_190250 (Medium).jpg

Now slide the ring gear over the dowel in the outer housing while sliding the dowel on the inner cup into the dial. Tighten down the allen screw in the center and check that the dial turns to both locks.
Now here is the little catch. Before you could disassemble the hub you had to burr out a swedge on the allen screw, now you get to make a new one :)
You do not have the required permissions to view the files attached to this post.
Robin
nizmut Offline

User avatar
You know you own a Patrol when…
 
Posts: 214
Images: 0
Joined: Sun Nov 10, 2013 8:41 pm
Has thanked: 81 times
Been thanked: 173 times
Location: Vallejo, Ca, USA

Postby nizmut » Tue Feb 21, 2017 1:24 am

The center part of the hub is simple.
Pull the snap ring, slide out the center, don't lose any rollers, they are free like a u-joint.
After cleanup, pack the bearing race with grease and stack in the rollers. It is easier to load the bearings from this side.
20170220_191421 (Medium).jpg


Then flip it over and drop the gear in and install the snap ring.
20170220_192639 (Medium).jpg


Another thing I did was chamfer the bolt holes in the outer cap as the lock washers had deformed the aluminum against the bolts.
The large o-ring goes in the groove of the center section that slips into the factory hub.
You do not have the required permissions to view the files attached to this post.
Robin
nizmut Offline

User avatar
You know you own a Patrol when…
 
Posts: 214
Images: 0
Joined: Sun Nov 10, 2013 8:41 pm
Has thanked: 81 times
Been thanked: 173 times
Location: Vallejo, Ca, USA

Postby mad4hws » Tue Feb 21, 2017 8:52 am

Very helpful picks. Thanks for sharing.
mad4hws Offline


I love driving my Patrol!
 
Posts: 594
Images: 336
Joined: Fri Mar 11, 2016 12:41 pm
Has thanked: 173 times
Been thanked: 400 times
Location: Connecticut, USA

Postby RiverPatrol » Tue Feb 21, 2017 12:04 pm

Excellent How-to with pics! :clap: :clap: :clap: Thank you!
Beyond any hope for intervention

Image
RiverPatrol Offline

User avatar
Administrator
Administrator
 
Posts: 7433
Images: 959
Joined: Thu Oct 04, 2012 10:42 am
Has thanked: 6775 times
Been thanked: 2289 times
Location: Temecula, CA

Postby nizmut » Sat Feb 25, 2017 11:42 pm

So I pulled the left hub and wheel bearings a few days ago. The hub is in pretty rough shape from someone setting up the wheel bearings with a chisel. That caused the o-ring on the locking hub not to seal, allowing water to enter, and rust to grow. After a lot of wire wheeling I think I can save it, but will need need to do some burr work and a secondary seal option.
So now into the fun stuff. Before you remove these 6 nuts, go buy LOTS of shop towels. First you remove the inner snap ring(You had to remove the outer one to remove the inner part of the locking hub), then remove the nuts.
20170225_174125 (Medium).jpg


The backing plate will slide off, then grab the spindle and it will slide off too.
Don't drop the stub axle, once it pivots it will fall out.
20170225_180946 (Medium).jpg

Welcome to the lots of towels part. I just slid the stub axle into the spindle and stored it in a safe place that I wouldn't be upset about the mess.

20170225_180959 (Medium).jpg

At this point it was dinner time, or any other excuse to not start cleaning that mess out.
You do not have the required permissions to view the files attached to this post.
Robin
nizmut Offline

User avatar
You know you own a Patrol when…
 
Posts: 214
Images: 0
Joined: Sun Nov 10, 2013 8:41 pm
Has thanked: 81 times
Been thanked: 173 times
Location: Vallejo, Ca, USA

Postby mad4hws » Sun Feb 26, 2017 6:29 am

looks like chocolate mousse.

Thanks for sharing again. this is going to be very helpful very soon as i start tearing into mine.
mad4hws Offline


I love driving my Patrol!
 
Posts: 594
Images: 336
Joined: Fri Mar 11, 2016 12:41 pm
Has thanked: 173 times
Been thanked: 400 times
Location: Connecticut, USA

Postby nizmut » Sun Feb 26, 2017 10:35 pm

OK, so after we got home from volunteering at the gem show I played in the shop a bit. Started by cleaning up the spindle and stub axle.
20170226_161955 (Medium).jpg

Then I pulled the snap ring and removed the roller bearing from the spindle. One of the cheap 4 for $10 pinch bars slid down the spindle can tap out the bearing. I have new bearings so didn't need to be overly careful. The tracta joint is a little rough and will take some cleaning up, but with the locking hubs I'll run it.

After that I pulled all the bolts from the seal retainer, and all the nuts from the kingpin bearing caps. I then used a brass drift and tapped the caps out from the inside. Don't loose the shims! Then grab the outer knuckle and give it a wiggle and the seal will pop out.
20170226_170424 (Medium).jpg

I then mucked all the grease out with rags and put it in the solvent pan. (If you are in California, Tractor Supply has a parts cleaning solution that still works)

After the outer knuckle is off it is easy to grab the inner axle and slide it out.
20170226_170431 (Medium).jpg


After the axle is out you can do some more grease mucking in the housing.
20170226_170446 (Medium).jpg


After I mucked out the housing I tapped out the races, I switched to a steel drift because I have new races and good brass drifts are expensive.
20170226_172430 (Medium).jpg


Then I had to go cook elk burger patties for my lunches next week.
You do not have the required permissions to view the files attached to this post.
Robin
nizmut Offline

User avatar
You know you own a Patrol when…
 
Posts: 214
Images: 0
Joined: Sun Nov 10, 2013 8:41 pm
Has thanked: 81 times
Been thanked: 173 times
Location: Vallejo, Ca, USA

Postby RiverPatrol » Mon Feb 27, 2017 11:02 am

Thanks for the tip on California solvent. What brand is it?
Beyond any hope for intervention

Image
RiverPatrol Offline

User avatar
Administrator
Administrator
 
Posts: 7433
Images: 959
Joined: Thu Oct 04, 2012 10:42 am
Has thanked: 6775 times
Been thanked: 2289 times
Location: Temecula, CA

Postby nizmut » Mon Feb 27, 2017 11:22 pm

RiverPatrol wrote:Thanks for the tip on California solvent. What brand is it?

PSC 1000
Robin
nizmut Offline

User avatar
You know you own a Patrol when…
 
Posts: 214
Images: 0
Joined: Sun Nov 10, 2013 8:41 pm
Has thanked: 81 times
Been thanked: 173 times
Location: Vallejo, Ca, USA

PreviousNext

Return to Show us Your Patrol!

Who is online

Users browsing this forum: No registered users and 1 guest

cron