

1967 Family Patrol Project
-

- Administrator

- Posts: 7831
- Joined: Thu Oct 04, 2012 10:42 am
- Location: Temecula, CA
- Has thanked: 7744 times
- Been thanked: 2482 times
- Contact:

-

- Administrator
- Posts: 1225
- Joined: Sun Jul 28, 2013 12:45 am
- Location: Roseville, California
- Has thanked: 646 times
- Been thanked: 1149 times
- Contact:
Re: 1967 Family Patrol Project
Just a quick FYI! It's January 1, 2023... I declare that this is the year of the Patrol!
Let's have an awesome 2023!
John
Let's have an awesome 2023!
John
-
- Administrator
- Posts: 7831
- Joined: Thu Oct 04, 2012 10:42 am
- Location: Temecula, CA
- Has thanked: 7744 times
- Been thanked: 2482 times
- Contact:

-
- I love driving my Patrol!

- Posts: 635
- Joined: Sun Jul 19, 2015 4:36 pm
- Location: USA
- Location: North Carolina, USA
- Has thanked: 457 times
- Been thanked: 791 times
- Contact:
Re: 1967 Family Patrol Project
Probably on the Japanese calendarRiverPatrol wrote:Is that on the Chinese calendar?

Paul
-
- Administrator
- Posts: 1225
- Joined: Sun Jul 28, 2013 12:45 am
- Location: Roseville, California
- Has thanked: 646 times
- Been thanked: 1149 times
- Contact:
Re: 1967 Family Patrol Project
In honor of the Year of the Patrol -- I spent some quality time in the shop new year's day!
I got the dust flanges sand blasted and painted - Yes, the paint job turned out "gritty" -- it was windy! Anyway, grit or no, the part is hidden and this means I am able to do final front axle assembly!

Then got started on the driver side of the front axle... but, I noticed that the lower bearing race was shiny in spots. I tried to wipe it off, but it turns out that it's not just dirt aged in place from just sitting between the roller bearings, but dents in the bearing itself from sitting!

On closer inspection, well, um, yea, those shiny spots are actually dents. Dang!

At least it's a standard bearing! O’Reilly Auto Parts to the rescue -- It will be ready for pickup sometime today! And, in case you were wondering, no, this bearing will not fit my daughter's 2007 Corolla
https://www.oreillyauto.com/detail/c/na ... bca0/30304

So, that meant I was dead in the water as far as my New Year's Day axle assembly adventure... So, I came up with an alternative!
I finished installing the DRO (digital read out) on my vintage Bridgeport. I used the standard glass 5 micron resolution scales that came in the DRO kit, but with my Xmas bluetooth adapter kit (I even assembled it on Xmas day!) that uses an Android app for the interface -- way more useful that the cheap, old school display that came in the kit! (FYI, the interface kit is really inexpensive too!). Also, DROs are really cool as you can work in metric as easily as in imperial measurements!
Is it weird that I kinda get a kick out of installing cutting edge technology onto a 1948 vintage mill!
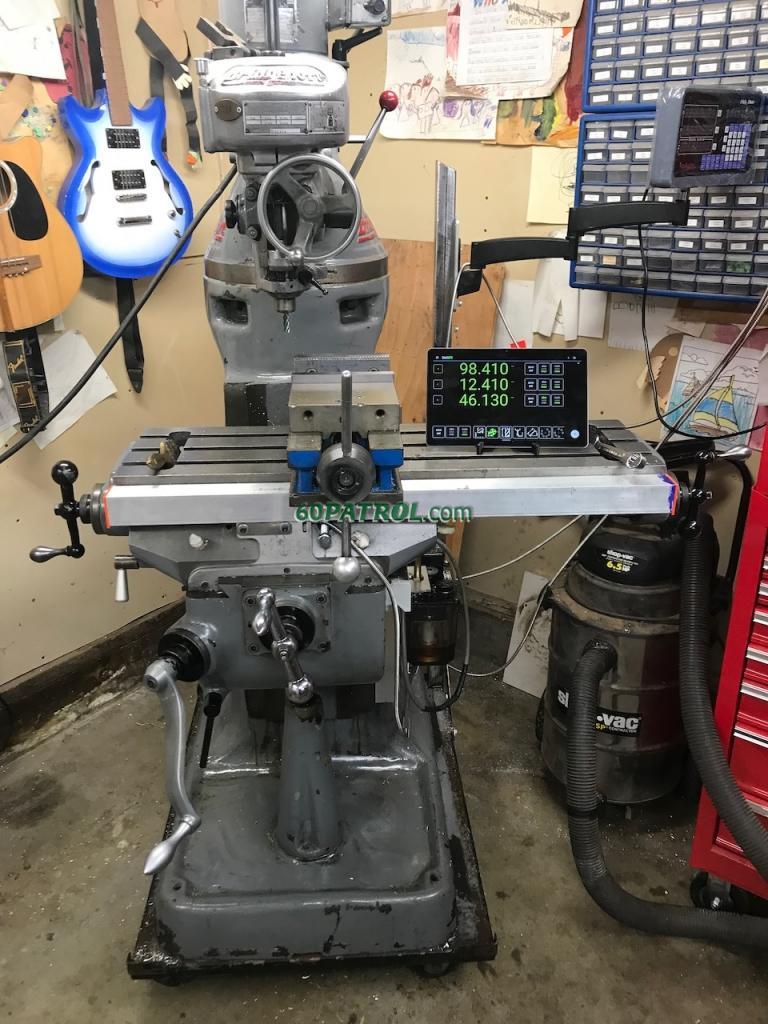
So, to finish out the day and test-drive the DRO, I made a pair of .91" dice (aka 23mm)

J
I got the dust flanges sand blasted and painted - Yes, the paint job turned out "gritty" -- it was windy!
Anyway, grit or no, the part is hidden and this means I am able to do final front axle assembly! Then got started on the driver side of the front axle... but, I noticed that the lower bearing race was shiny in spots. I tried to wipe it off, but it turns out that it's not just dirt aged in place from just sitting between the roller bearings, but dents in the bearing itself from sitting!
On closer inspection, well, um, yea, those shiny spots are actually dents. Dang!
At least it's a standard bearing! O’Reilly Auto Parts to the rescue -- It will be ready for pickup sometime today! And, in case you were wondering, no, this bearing will not fit my daughter's 2007 Corolla
https://www.oreillyauto.com/detail/c/na ... bca0/30304
So, that meant I was dead in the water as far as my New Year's Day axle assembly adventure... So, I came up with an alternative!
I finished installing the DRO (digital read out) on my vintage Bridgeport. I used the standard glass 5 micron resolution scales that came in the DRO kit, but with my Xmas bluetooth adapter kit (I even assembled it on Xmas day!) that uses an Android app for the interface -- way more useful that the cheap, old school display that came in the kit! (FYI, the interface kit is really inexpensive too!). Also, DROs are really cool as you can work in metric as easily as in imperial measurements!
Is it weird that I kinda get a kick out of installing cutting edge technology onto a 1948 vintage mill!
So, to finish out the day and test-drive the DRO, I made a pair of .91" dice (aka 23mm)
J

-
- Administrator
- Posts: 1225
- Joined: Sun Jul 28, 2013 12:45 am
- Location: Roseville, California
- Has thanked: 646 times
- Been thanked: 1149 times
- Contact:
Re: 1967 Family Patrol Project
I got to spend a little time on the front axle last night. Trying to get the hubs assembled with the new lower bearing and race. It tapped in nicely and made the steering smooth. Actually had to remove one of the upper shims to get the proper resistance too.
Next, time to install those dust shields -- aside from the extra holes where I drilled out the spot welds, they look factory!

I wrestled with the hub preload -- according to the manual, tighten until its basically locked, then back it off 1/8th turn. It's really finicky. One mm either way and you go from not turning at all, to zero resistance. Even tightening the outer nut (with the lock washer between it and the inner nut is enough to lock it up. I give up... the bearings need replacing. I have most of a set, so I'll order the outers and be able to finish it in a day or two (finally!)

Anyway, as I was reading part numbers, the big ol' storm that's hitting northern California gave our neighbor's tree a bit of a hard time around 7pm! Took out two sections of cable and de-powered the entire neighborhood! My city electric utility is awesome! Power was up in about two hours, but they continued working all frickin' night! There were still two trucks there doing repairs at 4am.

So, before I pulled the hub back off, I admired the dust shields fit -- it can't be more than two millimeters. I'm wondering if I should machine a tiny bit more space.
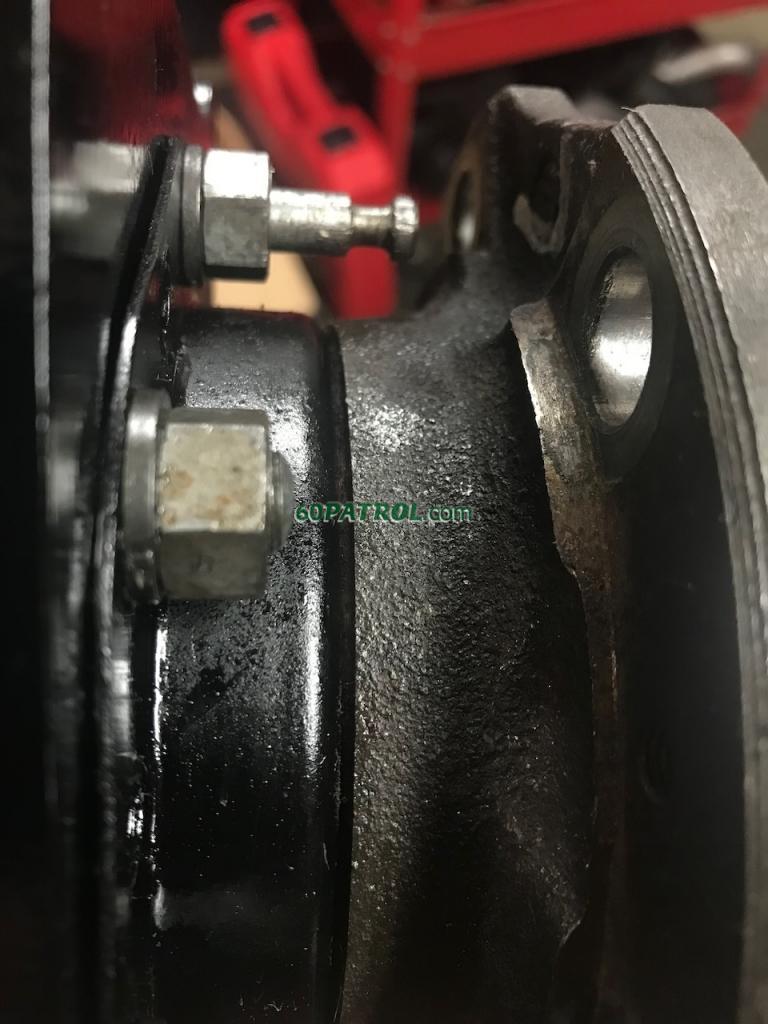
Thoughts? Do you think it needs more clearance? It's super close but does not touch at all.
Anyway, 2023 is off to a rockin' start!
j
Next, time to install those dust shields -- aside from the extra holes where I drilled out the spot welds, they look factory!
I wrestled with the hub preload -- according to the manual, tighten until its basically locked, then back it off 1/8th turn. It's really finicky. One mm either way and you go from not turning at all, to zero resistance. Even tightening the outer nut (with the lock washer between it and the inner nut is enough to lock it up. I give up... the bearings need replacing. I have most of a set, so I'll order the outers and be able to finish it in a day or two (finally!)
Anyway, as I was reading part numbers, the big ol' storm that's hitting northern California gave our neighbor's tree a bit of a hard time around 7pm! Took out two sections of cable and de-powered the entire neighborhood! My city electric utility is awesome! Power was up in about two hours, but they continued working all frickin' night! There were still two trucks there doing repairs at 4am.
So, before I pulled the hub back off, I admired the dust shields fit -- it can't be more than two millimeters. I'm wondering if I should machine a tiny bit more space.
Thoughts? Do you think it needs more clearance? It's super close but does not touch at all.
Anyway, 2023 is off to a rockin' start!
j
-
- I love driving my Patrol!
- Posts: 635
- Joined: Sun Jul 19, 2015 4:36 pm
- Location: USA
- Location: North Carolina, USA
- Has thanked: 457 times
- Been thanked: 791 times
- Contact:
Re: 1967 Family Patrol Project
I had the same problem on mine, with new bearings/races. Get the preload right with the first nut, then tightening the lock nut messes it up. Ended up making the preload with the first nut somewhat light, then when the locknut was tightened the preload was in range. Yes, it's a very fussy method for sure.faux40 wrote:I wrestled with the hub preload -- according to the manual, tighten until its basically locked, then back it off 1/8th turn. It's really finicky. One mm either way and you go from not turning at all, to zero resistance. Even tightening the outer nut (with the lock washer between it and the inner nut is enough to lock it up.

Paul
-
- Administrator
- Posts: 1225
- Joined: Sun Jul 28, 2013 12:45 am
- Location: Roseville, California
- Has thanked: 646 times
- Been thanked: 1149 times
- Contact:
Re: 1967 Family Patrol Project
Glad I'm not the only one! Thanks for the tip!r1lark wrote:I had the same problem on mine, with new bearings/races. Get the preload right with the first nut, then tightening the lock nut messes it up. Ended up making the preload with the first nut somewhat light, then when the locknut was tightened the preload was in range. Yes, it's a very fussy method for sure.
j
-
- Administrator
- Posts: 1225
- Joined: Sun Jul 28, 2013 12:45 am
- Location: Roseville, California
- Has thanked: 646 times
- Been thanked: 1149 times
- Contact:
Re: 1967 Family Patrol Project
Getting closer and closer!
I measured the thickness of the factory drum brake backing plate against the net thickness of my super-duper disk brake adapters. The disk adapters are between 0.5mm and 1.0mm thicker than the drum backing plates (hard to measure those drum plates standing out in the rain! ) -- I decided that since the space between the re-used dust shield and the hub is so frickin' tight, I should provide a little room. I don't want to turn the disk adapter bracket any thinner... not that it's borderline, but no reason to push it's limits. Instead, I turned the ridge on the read that faces the dust shield -- it's not really structural at all, so that little cut shouldn't matter. So, I removed the bearing races from both hubs and I cut it back about 0.025" (aka 0.6mm). Haven't done a test fit up yet as I removed the bearing races and don't want to shove them back in for a test fit. I mean, all things equal, it's not going to get any worse! (aside from the difference due to the new, yet to be installed bearings and races!).

Next, I am going to sandblast the hubs to prep for paint -- I 3d printed plugs to protect the insides from sand blasting and paint (y'all need a 3d printer! They are so useful!)

I plan to cold blue the two mounting faces and then protect them while painting (where the disk rotor presses on the hub and where the hub-lock selector mounts)
Then it will be down to final assembly and off the bench! It looks like that axle went up onto my workbench 475 days ago! Dang, I am so, so slow!
Happy Sunday!
j
I measured the thickness of the factory drum brake backing plate against the net thickness of my super-duper disk brake adapters. The disk adapters are between 0.5mm and 1.0mm thicker than the drum backing plates (hard to measure those drum plates standing out in the rain!
) -- I decided that since the space between the re-used dust shield and the hub is so frickin' tight, I should provide a little room. I don't want to turn the disk adapter bracket any thinner... not that it's borderline, but no reason to push it's limits. Instead, I turned the ridge on the read that faces the dust shield -- it's not really structural at all, so that little cut shouldn't matter. So, I removed the bearing races from both hubs and I cut it back about 0.025" (aka 0.6mm). Haven't done a test fit up yet as I removed the bearing races and don't want to shove them back in for a test fit. I mean, all things equal, it's not going to get any worse! (aside from the difference due to the new, yet to be installed bearings and races!).Next, I am going to sandblast the hubs to prep for paint -- I 3d printed plugs to protect the insides from sand blasting and paint (y'all need a 3d printer! They are so useful!)
I plan to cold blue the two mounting faces and then protect them while painting (where the disk rotor presses on the hub and where the hub-lock selector mounts)
Then it will be down to final assembly and off the bench! It looks like that axle went up onto my workbench 475 days ago! Dang, I am so, so slow!
Happy Sunday!
j