1967 Family Patrol Project

Builds, refurbishments, restorations, upgrades
User avatar
Administrator
Administrator
Posts: 1225
Joined: Sun Jul 28, 2013 12:45 am
Location: Roseville, California
Has thanked: 646 times
Been thanked: 1149 times
Contact:

Re: 1967 Family Patrol Project

Post by faux40 »

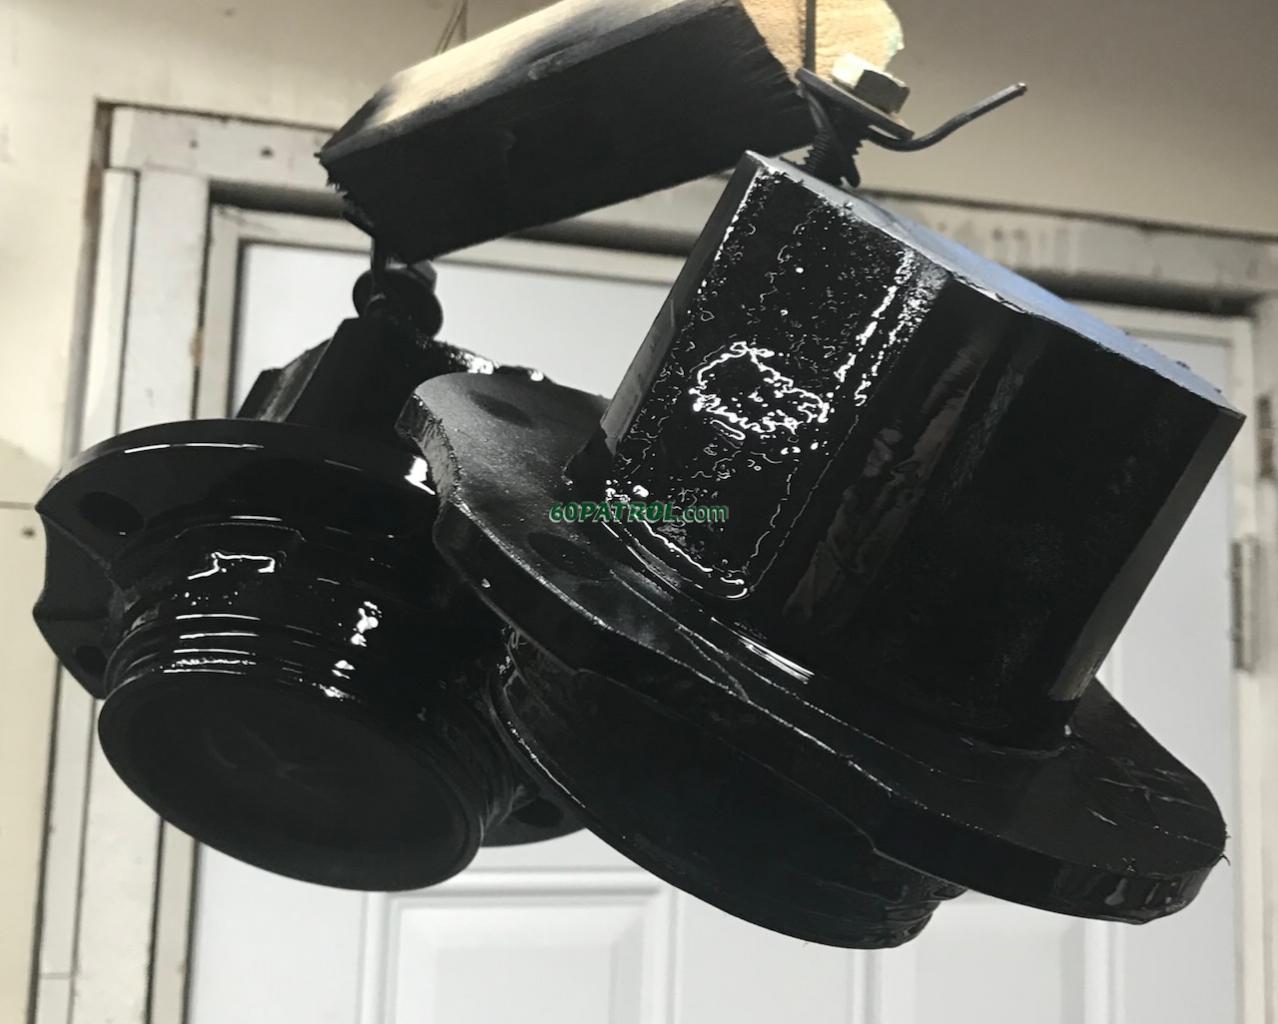
Sandblasted and ready for paint!
8349

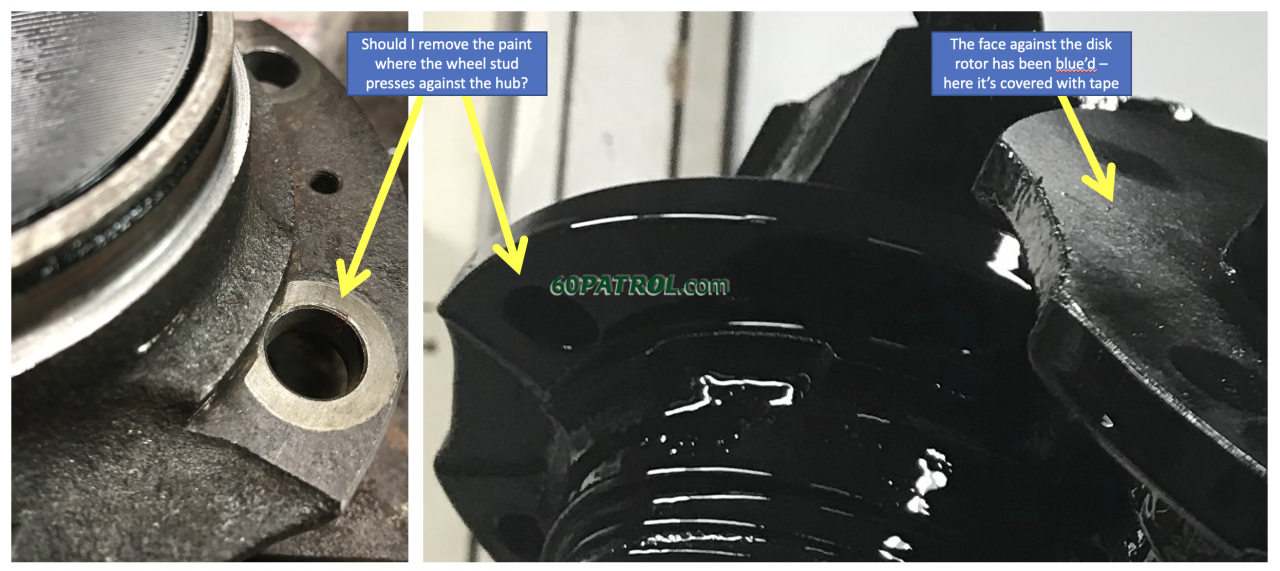
I forgot to take a picture of the rotor-mounting face and the hub lock face after bluing -- just hopeful that the blue will provide a little rust resistance. Although, after rinsing the part flash-rusted a little including on the blued surface. Can I add a second coat of bluing?

After two coats of rust reformer black primer (it's actually a flat black, this is only shiny as the coat is still wet). The blued surfaces are covered with painter's tape to keep paint off them.
8347

Question -- Should I remove the paint from the little circle around the back of each wheel stud hole where it presses into the hub? Does the paint thickness matter to the stud?
8350

Final coat of gloss black tonight!
j
User avatar
Patrol Fanatic!
Patrol Fanatic!
Posts: 3004
Joined: Sat Feb 23, 2013 11:28 am
Location: Lutherville, MD
Has thanked: 6018 times
Been thanked: 1603 times

Re: 1967 Family Patrol Project

Post by Esteban »

faux40 wrote:
Question -- Should I remove the paint from the little circle around the back of each wheel stud hole where it presses into the hub? Does the paint thickness matter to the stud?
8350

Final coat of gloss black tonight!
j
Beautiful work John! Congratulations.

Regarding your question, the picture came incomplete and it's not showing the studs. Difficult to have an idea.
Owner of the same Patrol since 1967
User avatar
Administrator
Administrator
Posts: 1225
Joined: Sun Jul 28, 2013 12:45 am
Location: Roseville, California
Has thanked: 646 times
Been thanked: 1149 times
Contact:

Re: 1967 Family Patrol Project

Post by faux40 »

Okie doke -- there are a couple of "issues" -- There are ALWAYS at least a couple of issues!

The first... You remember this? The super cool factory dust shield... Turns out that it needs a tiny bit more space beyond the relief I already gave it. When snugging the bearings, there was zero room between sloppy and locked. Once I removed the dust shield, the bearings can be snugged per the manual. So, that means that dust shield drags a bit.. man, it must be super close to fitting!
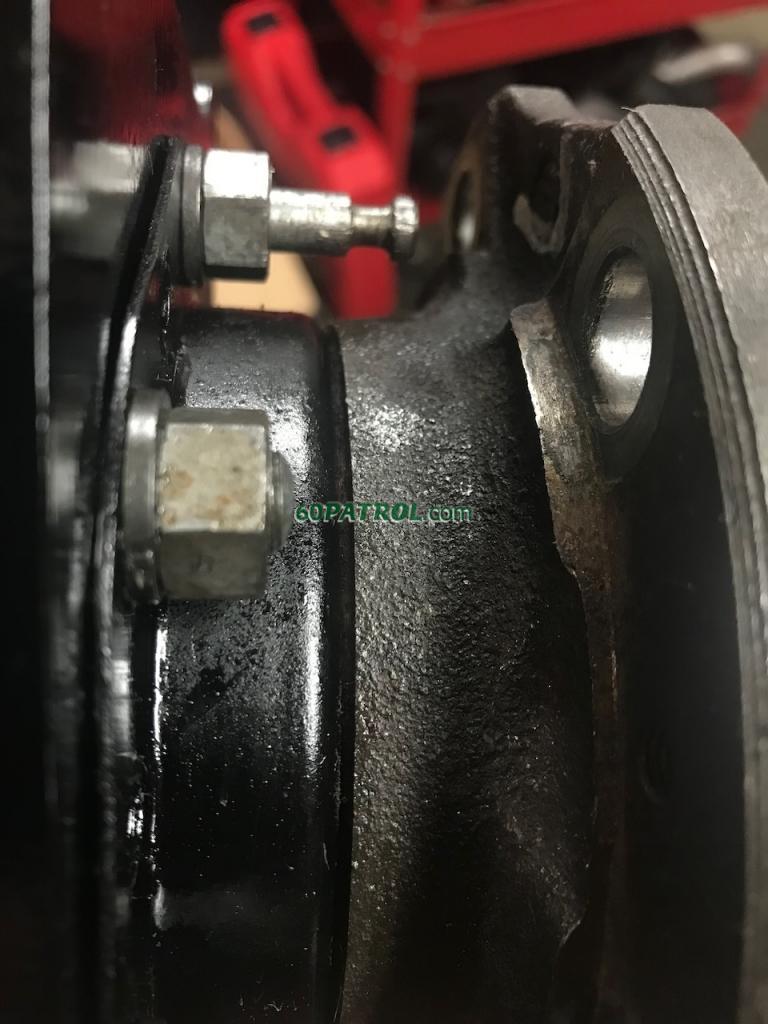
8344

The plan for this is to slightly relieve the dust shield itself, then relieve the flange on the backs of the hubs a bit more... Not worried, it's past the bearing, so its not load bearing, and I only need 10 thousandths or so more room!

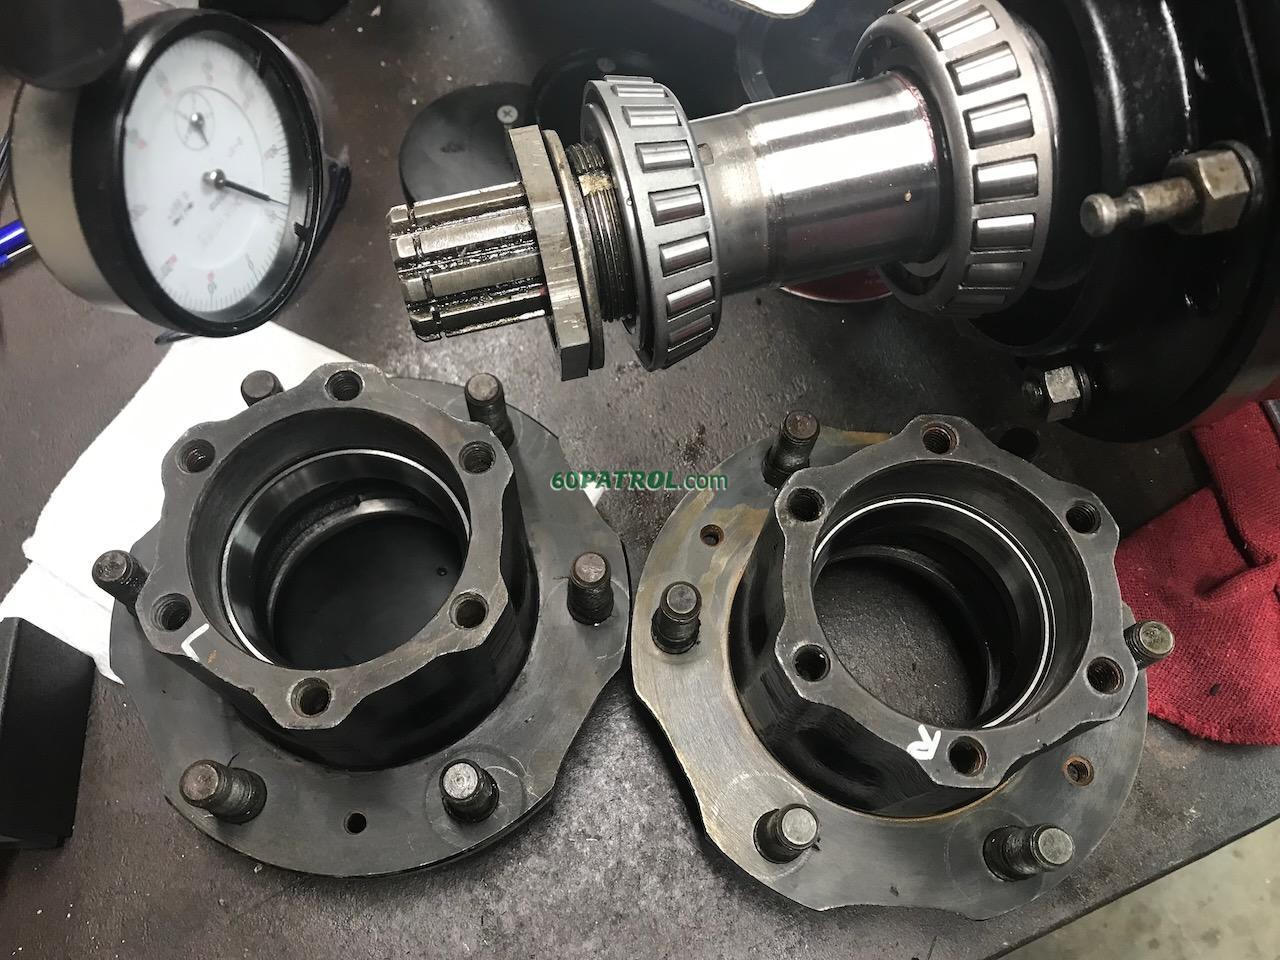
The second issue is that one of the two hubs has about 5 thousandths runout at the outer edge of the face. If my memory is moderately correct, I think Esteban said it should be closer to one or two thousandths. Not too difficult, chuck it up in the four-jaw, square it up and clean up the face and cut that relief. The big challenge is getting the hub squared up and concentric in the lathe. It has six faces so it would fit a three jaw chuck well, but those aren't adjustable to fine tune it to concentric. That's what the four jaw is for... But six sides on the hub vs a 4 jaw chuck means it's grabbing on two smooth surfaces and two lumpy, tapered surfaces. I fought and fought, but could not get it a close as I needed. I mean, I knocked that thing about forever and just could not get it into spec in all directions. Ugh!

So, plan B, turn it between centers. This is well known to be the best way to precision turn... So, all I need is an arbor!

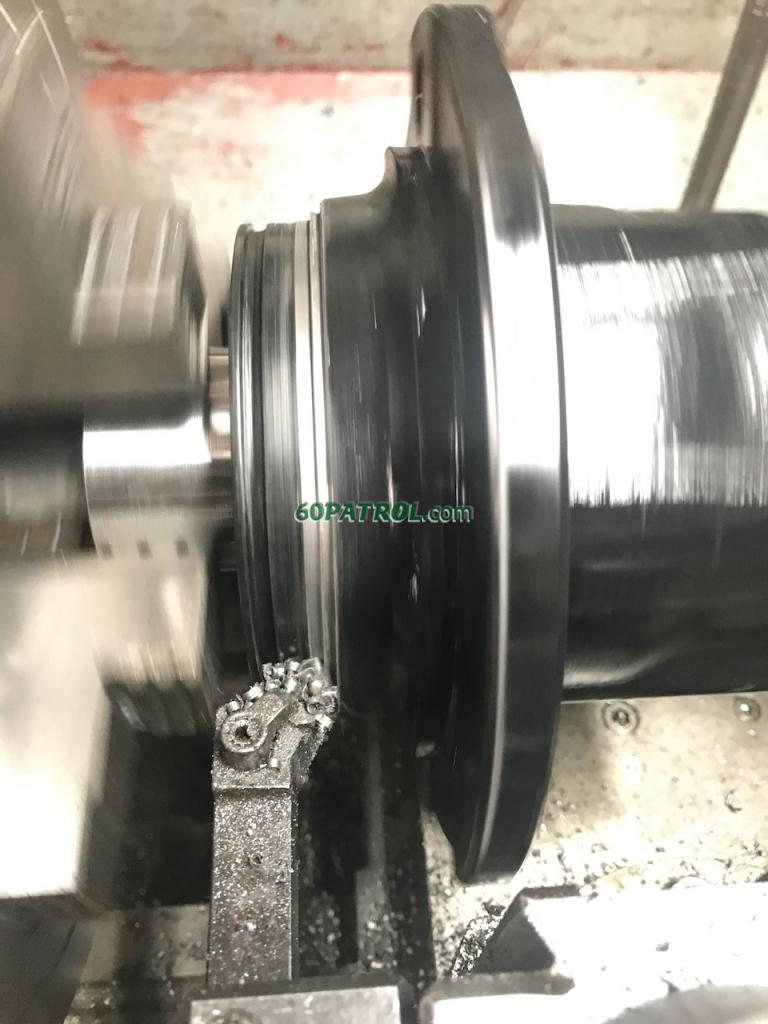
I ran... well drove... down to the metal reseller and grabbed two feet of 2.375" diameter mild steel.. I really only need 8", but that 25 pound chunk was in their scrap pile so it's a bit cheaper per pound (and it leaves me enough material to try again if I screw it up). On the four jaw, I turned one end down to 2" diameter to fit in my largest lathe dog (or should I saw lathe dawg?), then center drilled both ends. Here it is on centers, ready to work!
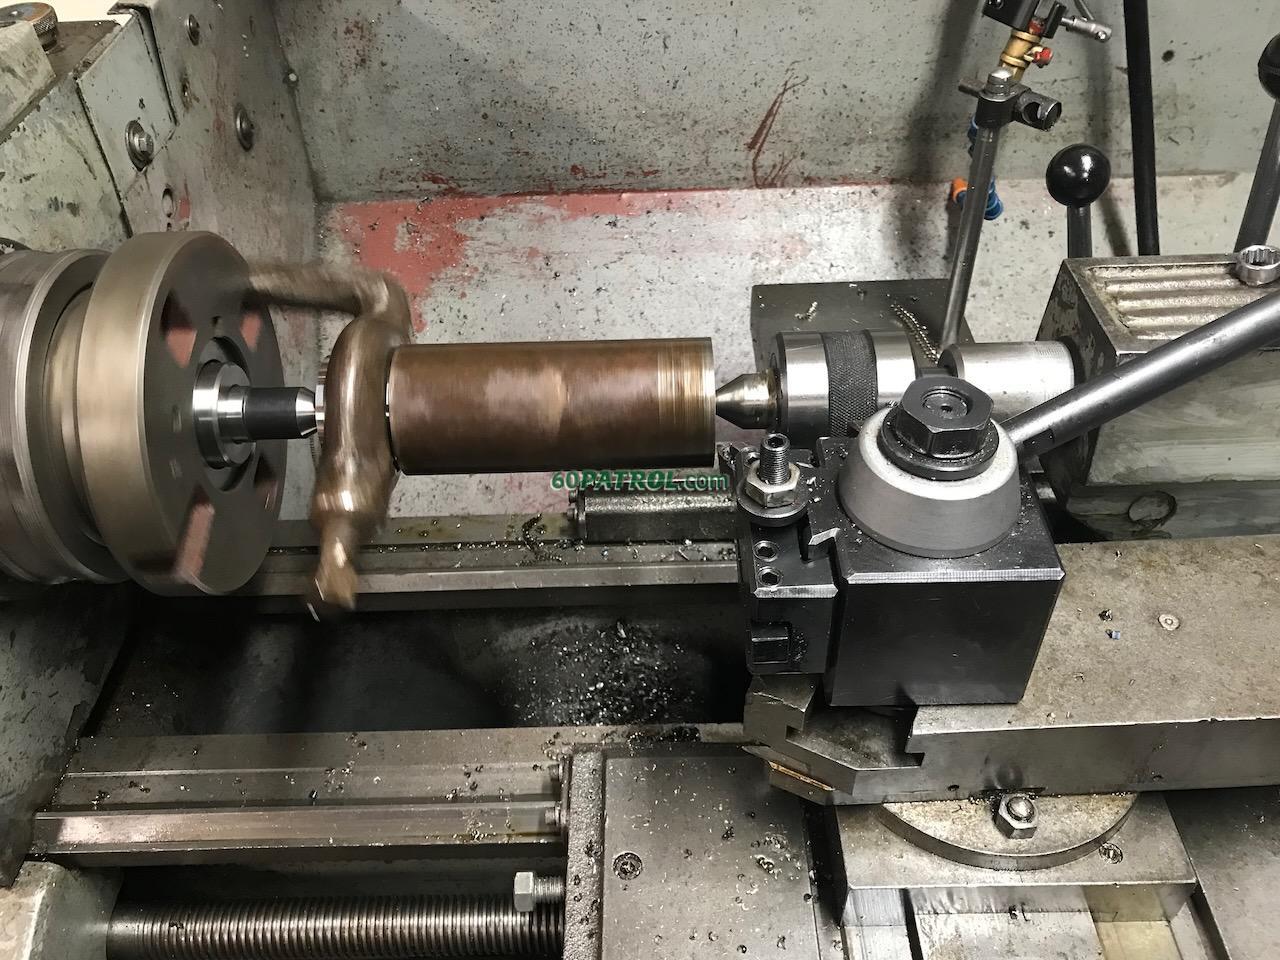
8357

First, I turned it down the full length to the shoulder to match the ID of the inner bearing (I measured the spindle diameters), then turned the first half down to the ID of the outer bearing. Once the bearings slide on (snugly of course), we're ready to go!

So the hub will sit on it just like the axle shaft, so any work I do on it will be perfectly concentric with the bearing races and axle shaft! Hopefully the runout will be down in the ten-thousandths range! I still need to make a clamp to press the bearings tightly to the hub. I'm not going to mess with threading it. Rather, I plan to make a split-collar that I can slide on the clamp down to hold it in place.
8359

Here's the new arbor wearing it's dawg
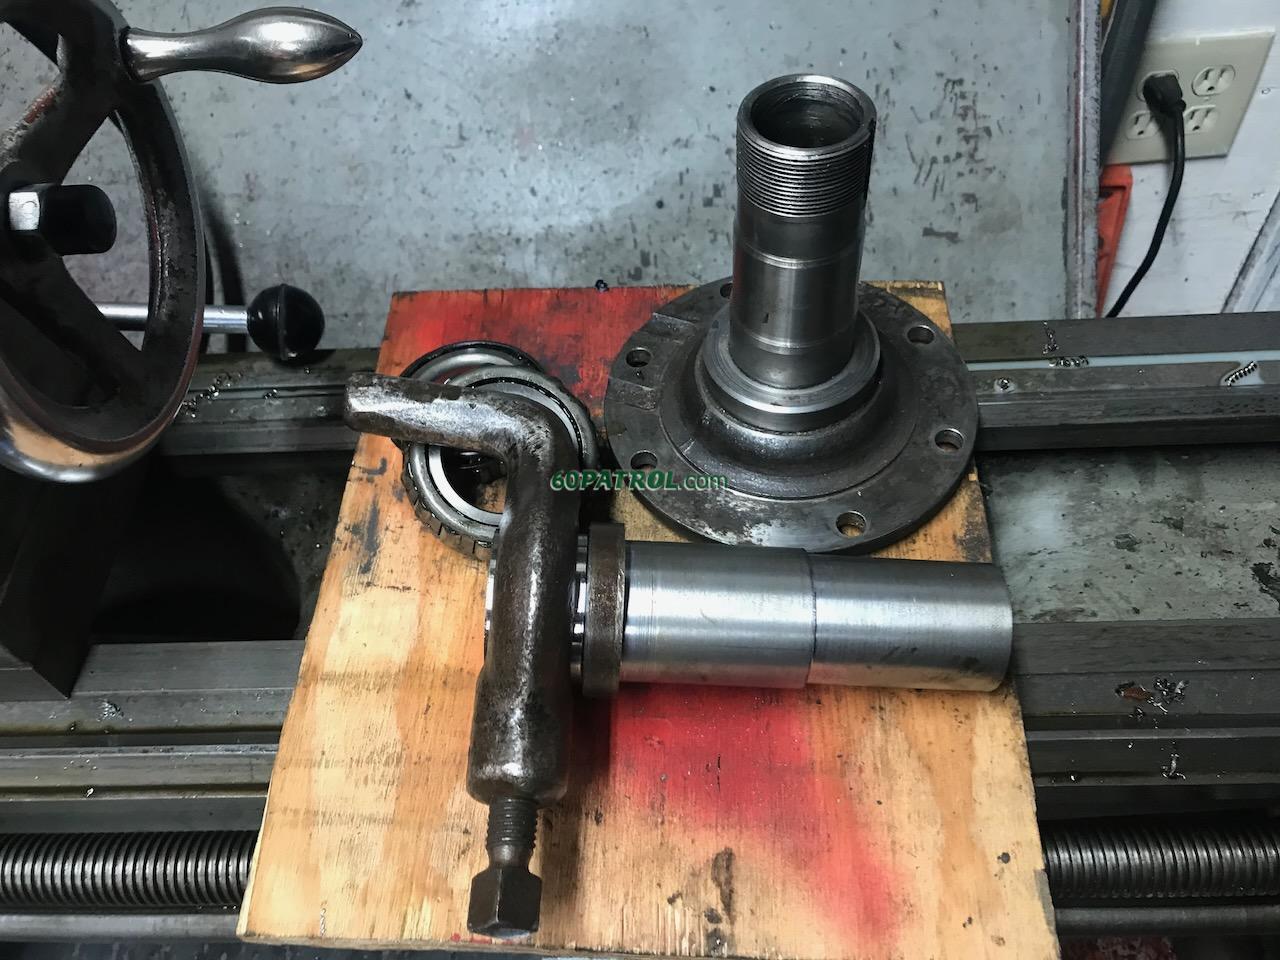
8360

And the arbor undressed! ;-) I'll label and keep this arbor around in case I ever decide to do another patrol front disk conversion! It will make it way easier!
8361

Once the color is ready, I'll assemble it on the arbor and turn the relief on the back -- I should have made the shoulder a bit wider -- maybe a half inch or so to make it easier to get tooling into it... too late now! ;-)

Obviously the last challenge is that the hub won't spin with the lathe since it will have bearings between the arbor and hub. There are two small threaded holes in the face. I plan to put a long screw into it so it will leverage against the dog itself for the drive. But this won't work when working on the back, so the bearing retaining collar will have a threaded hole that I will leave a long bolt in, then leave a long bolt in one of the hub hole to work as the drive.
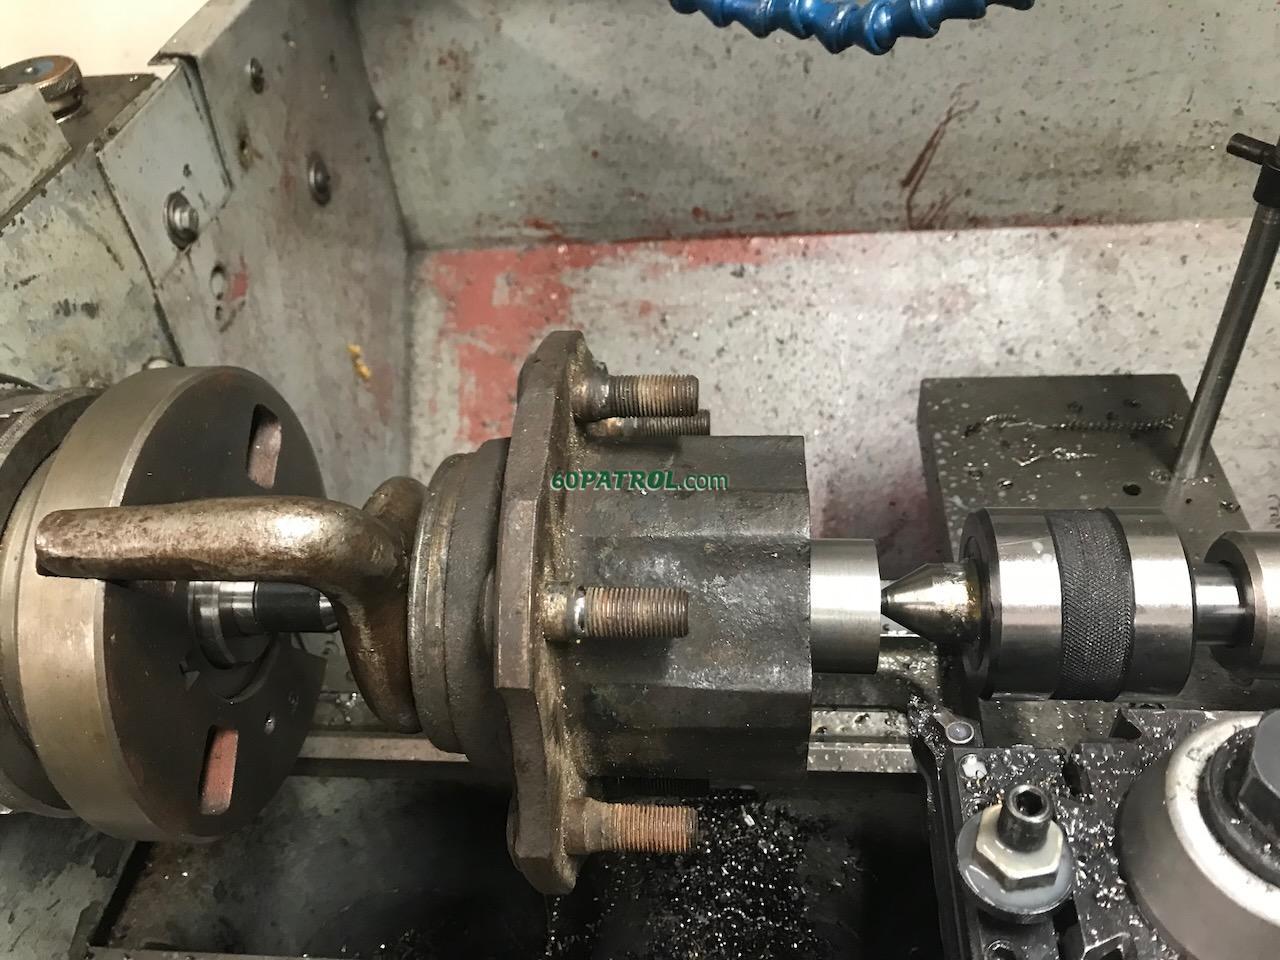
8358

j
User avatar
I love driving my Patrol!
Posts: 635
Joined: Sun Jul 19, 2015 4:36 pm
Location: USA
Location: North Carolina, USA
Has thanked: 455 times
Been thanked: 791 times
Contact:

Re: 1967 Family Patrol Project

Post by r1lark »

John, excellent solution and excellent machine work!!
Paul
User avatar
Patrol Fanatic!
Patrol Fanatic!
Posts: 3004
Joined: Sat Feb 23, 2013 11:28 am
Location: Lutherville, MD
Has thanked: 6018 times
Been thanked: 1603 times

Re: 1967 Family Patrol Project

Post by Esteban »

r1lark wrote:John, excellent solution and excellent machine work!!
X2
faux40 wrote:
The second issue is that one of the two hubs has about 5 thousandths runout at the outer edge of the face. If my memory is moderately correct, I think Esteban said it should be closer to one or two thousandths.
j
I tried to find something in the Service Manuals, and they have nothing in this regard.
Owner of the same Patrol since 1967
User avatar
Administrator
Administrator
Posts: 1225
Joined: Sun Jul 28, 2013 12:45 am
Location: Roseville, California
Has thanked: 646 times
Been thanked: 1149 times
Contact:

Re: 1967 Family Patrol Project

Post by faux40 »

Esteban wrote:
r1lark wrote:John, excellent solution and excellent machine work!!
X2
faux40 wrote:
The second issue is that one of the two hubs has about 5 thousandths runout at the outer edge of the face. If my memory is moderately correct, I think Esteban said it should be closer to one or two thousandths.
j
I tried to find something in the Service Manuals, and they have nothing in this regard.
Well, my memory was off... not much of a surprise there! ;-) Turns out that I was conflating specs you provided for another vehicle... you had provided max runout for a 2002 Pathfinder of 0.004" -- different vehicle, but I think, a good target for me to shoot for. Thanks!

So, compared to a later model vehicle, 0.004" on an ~11" diameter rotor is much better than the 0.005" I get on the ~6" diameter hub!. My goal is to get my rotor runout down to better than the 2002 pathfinder's!

BTW, thanks all for the feedback, ideas, and comments!

J
User avatar
Administrator
Administrator
Posts: 1225
Joined: Sun Jul 28, 2013 12:45 am
Location: Roseville, California
Has thanked: 646 times
Been thanked: 1149 times
Contact:

Re: 1967 Family Patrol Project

Post by faux40 »

Will it ever be done? ;-)

I cleaned up the hub with the most runout -- Made it a little better... just a little better. 0.004" runout at the outer edge of the hub. So, a one to two thousandths improvement. Not a lot, but good enough for me! The other hub was a little under 0.002" out, so I left the face alone.
8362

I increased the dust shield clearance a bit. Maybe a bit more than was needed, but it still looks good. Now there's about 1/8" showing between the hub and the shield when mounted
8363

There must be a slight difference in the spindles, because, everything else measures the same, but when assembled the right side rotor centers nearly perfectly in the brake caliper. The left, however, sits slightly outboard with the inner gap at 0.111" and the outer at 0.41 (if my memory is correct). So to center the rotor, I would need to either move the rotor inward by 0.035" or push the brake outward by the same. I chose to relieved the caliper mounts by 0.03" to center it... and it worked!
8364

So, to get the axle off the bench...
- Paint the newly machined spots on the hub (the rear dust shield area)
- Re-blue the hub face
- Press in the wheel studs
- Install the seals
- Grease the bearings

Then assemble it for the last time (knock on wood)... and move on to the next thing (finally!)

j
So, I just bought this Patrol….
Posts: 79
Joined: Thu Oct 27, 2022 9:45 pm
Location: tenn
Has thanked: 16 times
Been thanked: 114 times
Contact:

Re: 1967 Family Patrol Project

Post by v30crewcab »

time to mark a L and R on the brackets so it doesn't get mixed up at a later time!
User avatar
Administrator
Administrator
Posts: 1225
Joined: Sun Jul 28, 2013 12:45 am
Location: Roseville, California
Has thanked: 646 times
Been thanked: 1149 times
Contact:

Re: 1967 Family Patrol Project

Post by faux40 »

Lookie what's new -- Wheel Studs!
8365

For some reason, this feels like a major milestone.

So, the off-the-bench-list is down to just the seals, bearings, and assembly!

Happy Day!
j
User avatar
Administrator
Administrator
Posts: 1225
Joined: Sun Jul 28, 2013 12:45 am
Location: Roseville, California
Has thanked: 646 times
Been thanked: 1149 times
Contact:

Re: 1967 Family Patrol Project

Post by faux40 »

Getting closer... with one new and exciting hurdle added!

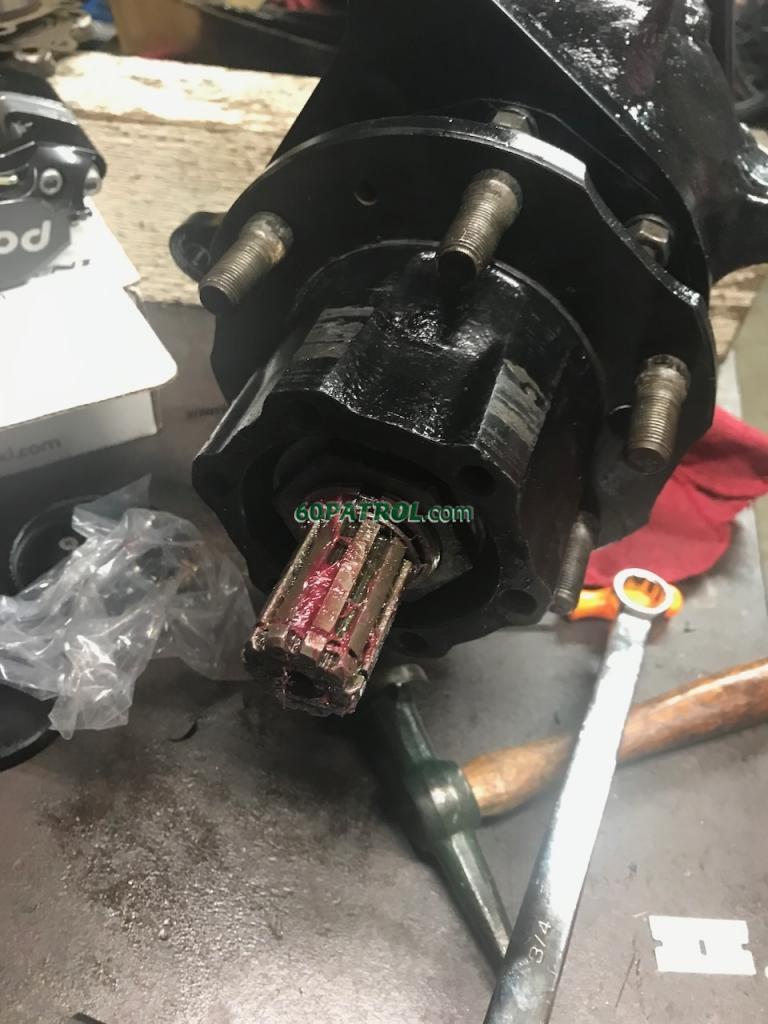
I installed the passenger side hub -- Packed the bearing with sticky, red, wheel bearing grease. It all went into place easily (and a little messily). The lock in place tab washer that goes between the two axle nuts cracked after I de-bent it, so I used the one from the driver side! The now one-missing lock in place tab is a problem for future me! ;-) Although I have a plan... I kept a bunch of parts from the old scrap axle, so I should have a spare *somewhere*!

I was following the manual's crank it down until it locks, the back it off a quarter turn... but it never locked up! It got pretty stiff to turn the hub, so I called it good. Then I backed the nut off just under that quarter turn as that was the point it would turn smooth yet a little firm (probably firm from the sticky grease in it!).
8366

8367

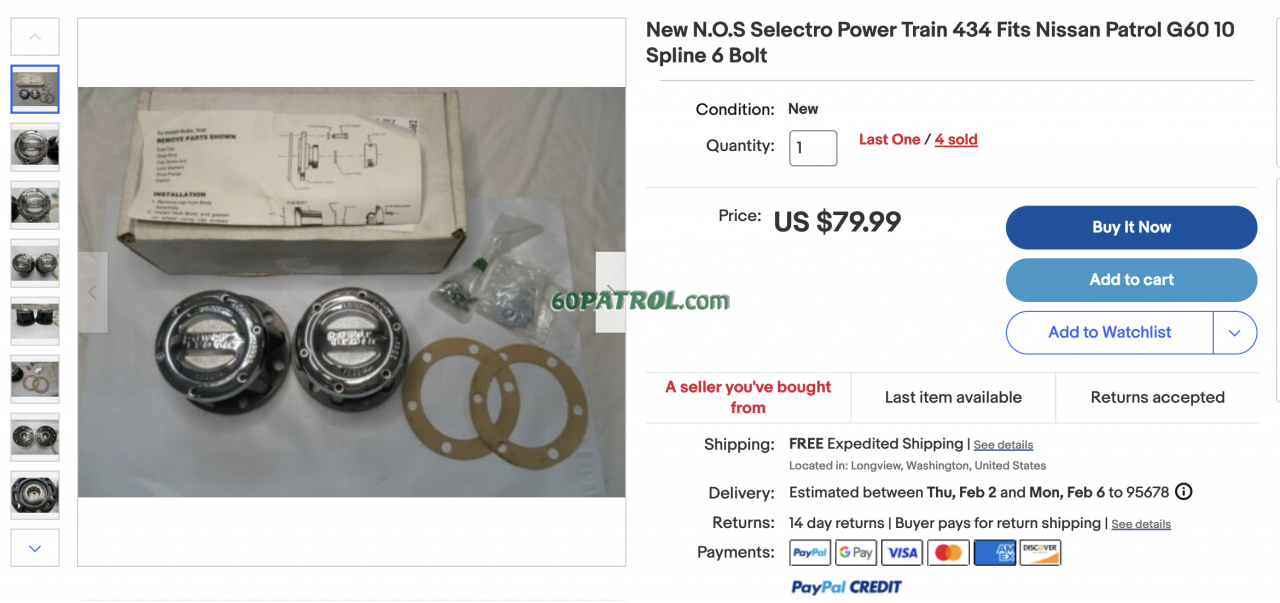
Next step, install the new hubs! Got them on eBay a very long time ago at the start of the tear down - They seem to be a perfect fit too. The seller even appears to have one set left -- that final set even has the gaskets & bolts! Sadly, my box did not have the bolts or gaskets. DANG!
8368

Last set...
https://www.ebay.com/itm/175161721975


I knew there were no bolts in the hub box, but kinda assumed the gaskets were in there. Somewhere I think I have some perfect gasket material, so if I find it, I'll craft a couple gaskets tomorrow to finish up the passenger side.

J
Post Reply