Good thing we have unlimited space on the host.faux40 wrote: Lastly, on an unrelated not -- I just uploaded my 1,001th picture to the Family Patrol gallery! DANG! Literally over 1,000 pictures!
https://www.60patrol.com/forum/gallery/ ... bum_id=140
HAPPY TUESDAY!
j
1967 Family Patrol Project
- Administrator

- Posts: 7817
- Joined: Thu Oct 04, 2012 10:42 am
- Location: Temecula, CA
- Has thanked: 7696 times
- Been thanked: 2477 times
- Contact:
Re: 1967 Family Patrol Project
Beyond any hope for intervention

- Patrol Fanatic!

- Posts: 3000
- Joined: Sat Feb 23, 2013 11:28 am
- Location: Lutherville, MD
- Has thanked: 6011 times
- Been thanked: 1600 times
Re: 1967 Family Patrol Project
Beautiful work John. I envy your welds. Well done.
Congratulations on your 1000 pictures posted!
Owner of the same Patrol since 1967
- Administrator

- Posts: 1225
- Joined: Sun Jul 28, 2013 12:45 am
- Location: Roseville, California
- Has thanked: 646 times
- Been thanked: 1149 times
- Contact:
Re: 1967 Family Patrol Project
My TIG welding skills are nearly good enough to enter gas-tank-city! I've be going to the school of Youtube and practicing my welding most evenings. TIG welding steel is tough, but easy-peazy when compared to aluminum!
TIG welding aluminum is hard! And complex -- It's not just setting the current and welding (btw, I used 125 amps), but also ac frequency makes a difference (120 hz), and the AC balance control for cleaning (30%). Plus everything has to be clean -- as in wipe it down with acetone clean. You even need to use a dedicated stainless steel wire brush to prep the surface for the weld. And a dedicated grinder wheel to shape the tungsten with.
While welding -- or attempting to weld anyway -- you have to hold the tungsten super close... but never touch the weld. When you touch the tungsten to the weld or to the rod you are dabbing into the puddle. You are done. Stop and regrind your tungsten before continuing. (I spend a lot of time grinding
)
But wait! There's more! You gotta hold the torch at the correct angles! Yea, angleS -- plural -- You not only have to aim the arc into the joint center -- or, for non matched materials, offset the arc slightly to the thicker material side -- all while still angling the torch back from the travel directly by 15-ish degrees.
Oh no, you're not done yet though -- Now you had to dab the rod into the molten puddle frequently (1x/second-ish or faster... but at a consistent pace to match the puddle travel)...but you can't leave the rod too close to the arc when not dabbing or the end will soften and droop.
Remeber the current setting? It's just a suggestion... the upper limit of the current that the welding will send to the torch. You actually control the current flow with the foot pedal to maintain that perfect molten puddle... but then, aluminum doesn't color change as it heats and melts. It gets frosty from the cleaning when you start, then turns shiny, then reflective once the aluminum is molten. That's your cue that it's time to dab and move!
Finally, you are welding and you need to move along the joint and weld the parts together - you can either incrementally about 1/8" at a time -- move, melt, dab, move, melt, dab, etc...., Or, you can move smoothly across the metal pushing the reflective spot along the joint all while dabbing over and over. Both methods sound easy, right? WRONG! If you choose incremental movements, you need to watch that puddle expand, dab, and them move exactly the same distance you did on the last move (or it will look bad!), then wait for the puddle to grow to the exact size of the previous puddle, then dab and move again, and again, and again!) Of course, I tend to do better with the small incremental movements that I do with the continuous moving. To do the smooth, continuous move, you need to move along the joint smoothly. Your speed and/or the pedal are how you control the puddle size... Move too quickly and you leave bird droppings along the joint. Too slow and the material sags, then blows through.
Sounds awful, right? But, I love it! It's actually kind of a thrill... everyone should try tigging at some point! Seriously, find a neighbor with a TIG welder, take a class at the local community college. Totally worth it!
While not even close to a stack of dimes or internet presentable, this cube -- well, open-top-cube, has some passable welds! (the cube below is from a few days ago -- not nearly as good as tonight's cube!

And BTW, welding is hot... Do you have any idea of what the BEST way to discover that your TIG gloves have strategically placed holes is? I know! OUCH!


So, a new pair of gloves and a few more cubes and I'll be ready to fork out the cash to buy a 4'x8'x1/8" sheet of aluminum that I, with my mediocre TIG skills, will turn into a Patrol gas tank that will fit right into the stock space with the stock tank shield too!
Happy Sunday!
j
TIG welding aluminum is hard! And complex -- It's not just setting the current and welding (btw, I used 125 amps), but also ac frequency makes a difference (120 hz), and the AC balance control for cleaning (30%). Plus everything has to be clean -- as in wipe it down with acetone clean. You even need to use a dedicated stainless steel wire brush to prep the surface for the weld. And a dedicated grinder wheel to shape the tungsten with.
While welding -- or attempting to weld anyway -- you have to hold the tungsten super close... but never touch the weld. When you touch the tungsten to the weld or to the rod you are dabbing into the puddle. You are done. Stop and regrind your tungsten before continuing. (I spend a lot of time grinding
But wait! There's more! You gotta hold the torch at the correct angles! Yea, angleS -- plural -- You not only have to aim the arc into the joint center -- or, for non matched materials, offset the arc slightly to the thicker material side -- all while still angling the torch back from the travel directly by 15-ish degrees.
Oh no, you're not done yet though -- Now you had to dab the rod into the molten puddle frequently (1x/second-ish or faster... but at a consistent pace to match the puddle travel)...but you can't leave the rod too close to the arc when not dabbing or the end will soften and droop.
Remeber the current setting? It's just a suggestion... the upper limit of the current that the welding will send to the torch. You actually control the current flow with the foot pedal to maintain that perfect molten puddle... but then, aluminum doesn't color change as it heats and melts. It gets frosty from the cleaning when you start, then turns shiny, then reflective once the aluminum is molten. That's your cue that it's time to dab and move!
Finally, you are welding and you need to move along the joint and weld the parts together - you can either incrementally about 1/8" at a time -- move, melt, dab, move, melt, dab, etc...., Or, you can move smoothly across the metal pushing the reflective spot along the joint all while dabbing over and over. Both methods sound easy, right? WRONG! If you choose incremental movements, you need to watch that puddle expand, dab, and them move exactly the same distance you did on the last move (or it will look bad!), then wait for the puddle to grow to the exact size of the previous puddle, then dab and move again, and again, and again!) Of course, I tend to do better with the small incremental movements that I do with the continuous moving. To do the smooth, continuous move, you need to move along the joint smoothly. Your speed and/or the pedal are how you control the puddle size... Move too quickly and you leave bird droppings along the joint. Too slow and the material sags, then blows through.
Sounds awful, right? But, I love it! It's actually kind of a thrill... everyone should try tigging at some point! Seriously, find a neighbor with a TIG welder, take a class at the local community college. Totally worth it!
While not even close to a stack of dimes or internet presentable, this cube -- well, open-top-cube, has some passable welds! (the cube below is from a few days ago -- not nearly as good as tonight's cube!
And BTW, welding is hot... Do you have any idea of what the BEST way to discover that your TIG gloves have strategically placed holes is? I know! OUCH!
So, a new pair of gloves and a few more cubes and I'll be ready to fork out the cash to buy a 4'x8'x1/8" sheet of aluminum that I, with my mediocre TIG skills, will turn into a Patrol gas tank that will fit right into the stock space with the stock tank shield too!
Happy Sunday!
j

- Administrator

- Posts: 7817
- Joined: Thu Oct 04, 2012 10:42 am
- Location: Temecula, CA
- Has thanked: 7696 times
- Been thanked: 2477 times
- Contact:
- Administrator

- Posts: 1225
- Joined: Sun Jul 28, 2013 12:45 am
- Location: Roseville, California
- Has thanked: 646 times
- Been thanked: 1149 times
- Contact:
Re: 1967 Family Patrol Project
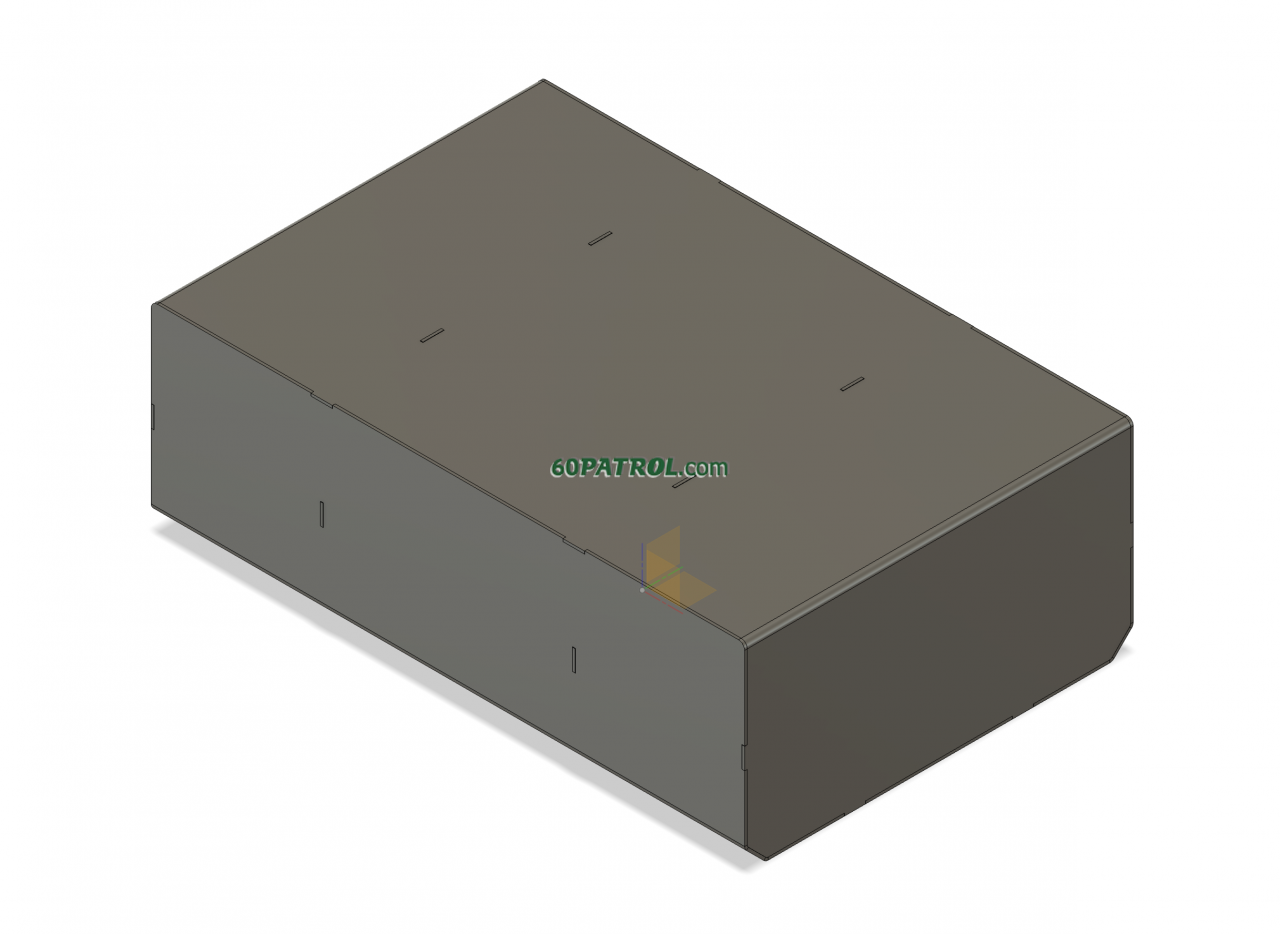
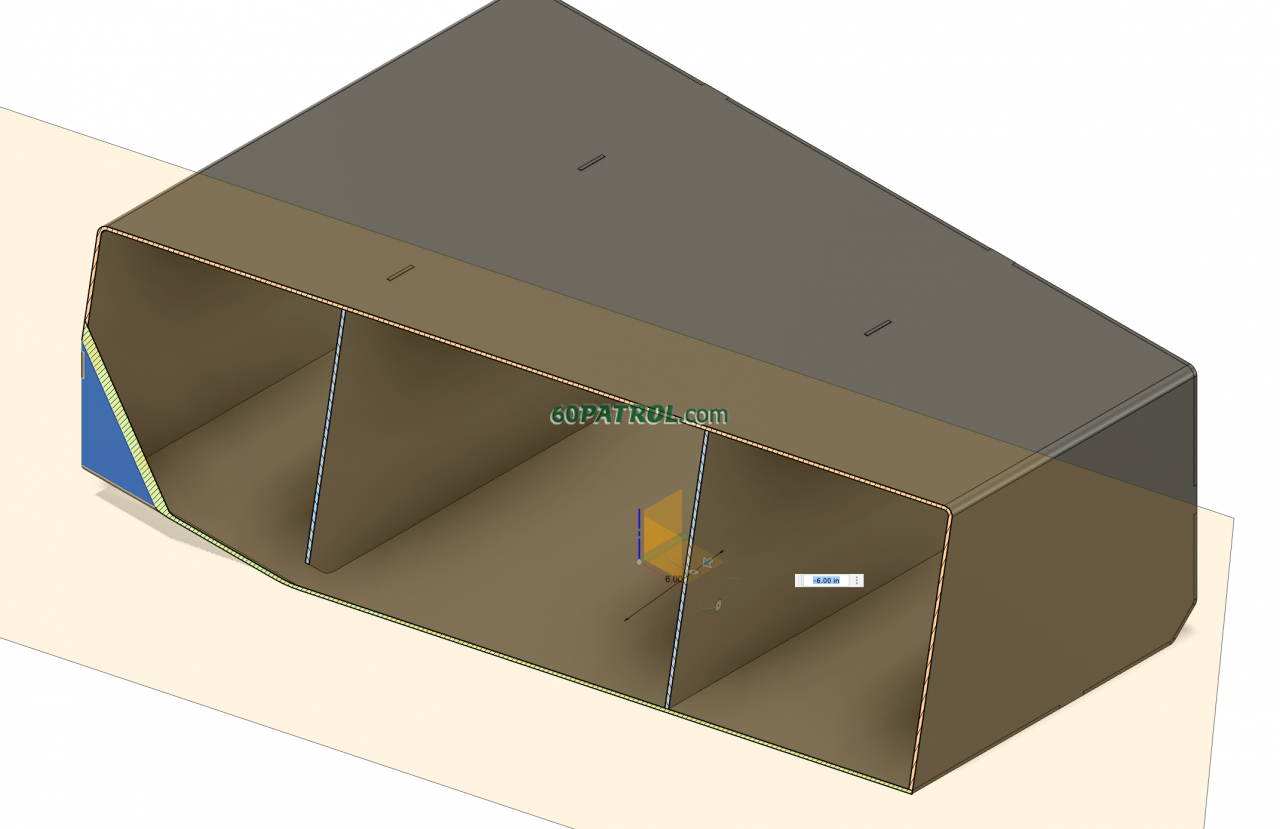
I have the gas tank design down! It's currently designed using 0.125 aluminum 5052 H32 sheet. It has two baffles in it to minimize fuel slosh. I'm getting the ports (e.g. level sender) cut separately in 1/4" to make sure they are strong, then I'll located, drill, tap, and weld them in place. I even added tiny-tabs to assist in holding the pieces in place while tack welding it!
The original tank has ~1" radius edges on the four long edges to fit into the matching radius bends in the skid plate... But radius bends are troublesome! So I'm using simple 45 degree panels at the bottom to fit inside the skid plate and leaving the top square. OSH Cut (a cnc laser cutting & bending service) will laser cut and bend the pieces (top, bottom, and the two baffles) for $310... but the shipping on top of that is a bit of a bear. I've asked them to hand-quote the shipping and expect it to come down drastically.
Here's the design:


HOWEVER, my machinest friend has a large brake that will bend 0.100 wall Aluminum 5052 sheets! So, I am seriously considering re-designing with 0.100 wall and doing the cutting/bending on my own. Either way, I still have to... uh, GET TO weld it! It certainly won't be as precise and I will be losing the super cool alignment tabs... but at about 1/2 the price!
I'll let you know!
The original tank has ~1" radius edges on the four long edges to fit into the matching radius bends in the skid plate... But radius bends are troublesome! So I'm using simple 45 degree panels at the bottom to fit inside the skid plate and leaving the top square. OSH Cut (a cnc laser cutting & bending service) will laser cut and bend the pieces (top, bottom, and the two baffles) for $310... but the shipping on top of that is a bit of a bear. I've asked them to hand-quote the shipping and expect it to come down drastically.
Here's the design:
HOWEVER, my machinest friend has a large brake that will bend 0.100 wall Aluminum 5052 sheets! So, I am seriously considering re-designing with 0.100 wall and doing the cutting/bending on my own. Either way, I still have to... uh, GET TO weld it! It certainly won't be as precise and I will be losing the super cool alignment tabs... but at about 1/2 the price!
I'll let you know!
- Administrator

- Posts: 1225
- Joined: Sun Jul 28, 2013 12:45 am
- Location: Roseville, California
- Has thanked: 646 times
- Been thanked: 1149 times
- Contact:
Re: 1967 Family Patrol Project
Just a quick update -- I've started ordering suspension bushings. A bunch showed up yesterday... and all but two items are on their way back to Amazon as they won't really work. Amazon probably hates me, but there is no real sizing info on parts like these so what are we to do?
Anyway, the sway bar bushing sets fit! $15.99/pair. They line up with the bolt holes and slide onto the sway bars!

(I've added the info to the parts DB)
I just placed another amazon order for a batch of sway bar end bushing and for the lower end of the front axle rebound stoppers.
Any suggestions on replacements for the upper end of the rebound stopper bushings? I think I can wiggle the steel bushings off of the two best ones I have, then rubber cement it back in place... but they'll still look "tired"

Anyway, the new bushings will be here tomorrow and we'll see if two-times is a charm! I'm also expecting some fuel tank parts tomorrow too!
Happy Thursday all!
J
Anyway, the sway bar bushing sets fit! $15.99/pair. They line up with the bolt holes and slide onto the sway bars!
(I've added the info to the parts DB)
I just placed another amazon order for a batch of sway bar end bushing and for the lower end of the front axle rebound stoppers.
Any suggestions on replacements for the upper end of the rebound stopper bushings? I think I can wiggle the steel bushings off of the two best ones I have, then rubber cement it back in place... but they'll still look "tired"
Anyway, the new bushings will be here tomorrow and we'll see if two-times is a charm! I'm also expecting some fuel tank parts tomorrow too!
Happy Thursday all!
J
- I love driving my Patrol!

- Posts: 655
- Joined: Mon Feb 27, 2017 9:05 am
- Location: Louisville KY USA
- Location: Louisville, Kentucky
- Has thanked: 514 times
- Been thanked: 631 times
- Contact:
Re: 1967 Family Patrol Project
They look very similar to the Energy Suspensions 9.5124G 20mm sway bar bushings I used but I went with black. I used Prothane 19-419-BL 7-3/8 droplinks for the rear but I had to take a little material off the bushings to get them to work better with the sway bar ends. I also used Energy Suspension 9-8123G end links on the front and 9-13119G tie rod boots on the front.

- Administrator

- Posts: 1225
- Joined: Sun Jul 28, 2013 12:45 am
- Location: Roseville, California
- Has thanked: 646 times
- Been thanked: 1149 times
- Contact:
Re: 1967 Family Patrol Project
You make it look so organized! My stuff always seems to be tucked into different corners of the shop! And, I would have preferred all black for the bushings, but it always seems to be slim-pickin's with our Patrols!rdarnell wrote:They look very similar to the Energy Suspensions 9.5124G 20mm sway bar bushings I used but I went with black. I used Prothane 19-419-BL 7-3/8 droplinks for the rear but I had to take a little material off the bushings to get them to work better with the sway bar ends. I also used Energy Suspension 9-8123G end links on the front and 9-13119G tie rod boots on the front.
j
- I love driving my Patrol!

- Posts: 655
- Joined: Mon Feb 27, 2017 9:05 am
- Location: Louisville KY USA
- Location: Louisville, Kentucky
- Has thanked: 514 times
- Been thanked: 631 times
- Contact:
Re: 1967 Family Patrol Project
mine too... I just dig them all out and lay them out to make sure I have everything I thought I had 
- Administrator

- Posts: 1225
- Joined: Sun Jul 28, 2013 12:45 am
- Location: Roseville, California
- Has thanked: 646 times
- Been thanked: 1149 times
- Contact:
Re: 1967 Family Patrol Project
Happy Friday!
Here it is! An Ikea style fuel tank! (a.k.a. Flat Pack Fuel Tank)... Fine, it's a dumb joke!

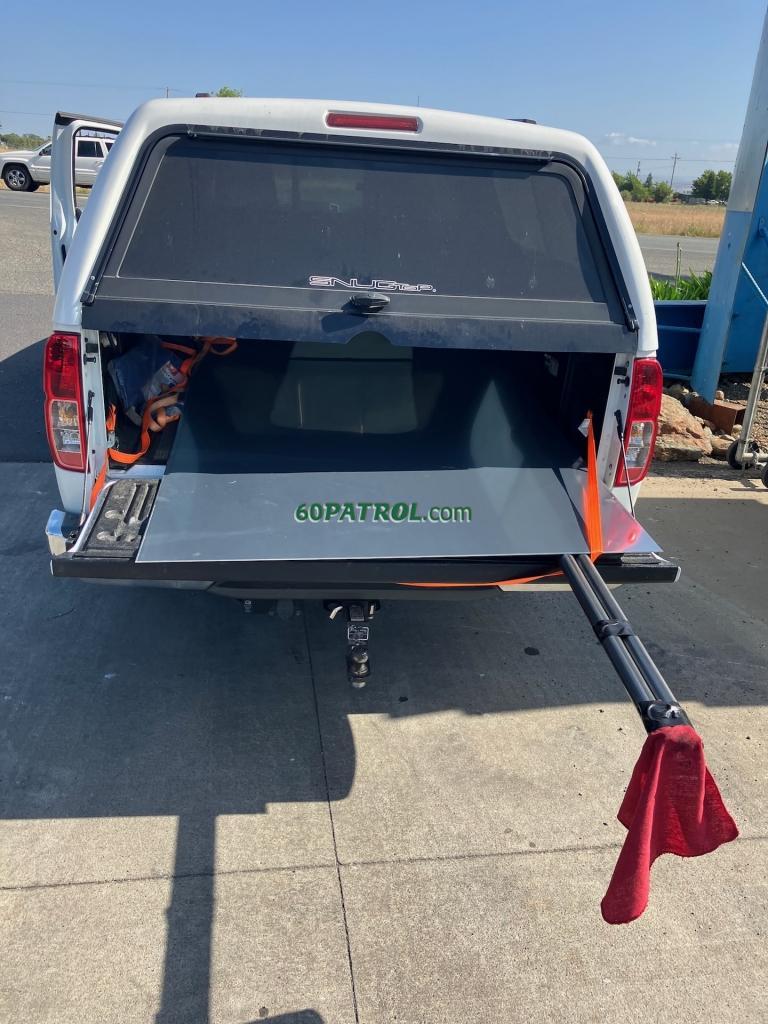
Early this morning I hit the road (66 miles) and picked up a 4x8x0.125" sheet of 5052 aluminum! Just over half of this will be sliced-diced-and-welded to make a new fuel tank for the Patrol! I had actually wanted to use 0.100" thick material so I could bend it in my buddy's brake, but I could only find that in 5x10 size sheets... that my little Frontier wouldn't be able to handle -- PLUS, those sheets, despite being 20% thinner, were way more expensive at over $7 per square foot vs. 5.63/sq.ft. for the 0.125" stuff AND I would have purchase much more material -- 4x8 is 32 square feet, 5x10 is 50 square feet... and I need about 18 sq feet. I does mean I will have to do about twice as much welding, but it's a trade off that I am happy with. Now that I can decently-ish TIG weld aluminum, TIG welding is really fun! Kinda zen-like.
Have a great weekend!
Here it is! An Ikea style fuel tank! (a.k.a. Flat Pack Fuel Tank)... Fine, it's a dumb joke!
Early this morning I hit the road (66 miles) and picked up a 4x8x0.125" sheet of 5052 aluminum! Just over half of this will be sliced-diced-and-welded to make a new fuel tank for the Patrol! I had actually wanted to use 0.100" thick material so I could bend it in my buddy's brake, but I could only find that in 5x10 size sheets... that my little Frontier wouldn't be able to handle -- PLUS, those sheets, despite being 20% thinner, were way more expensive at over $7 per square foot vs. 5.63/sq.ft. for the 0.125" stuff AND I would have purchase much more material -- 4x8 is 32 square feet, 5x10 is 50 square feet... and I need about 18 sq feet. I does mean I will have to do about twice as much welding, but it's a trade off that I am happy with. Now that I can decently-ish TIG weld aluminum, TIG welding is really fun! Kinda zen-like.
Have a great weekend!