

For some reason I thought I would be driving this thing already. Every time I start, something comes up. It was 27 below zero two weeks ago so that was one of my excuses not to do anything. The wheel dollies are nice because when I'm not working on it I can push it up against the wall in the garage. That keeps the wife happy and not freezing.


I started with the body pieces I thought would be the best.


After sandblasting I had to build or replace various sections.


I rebuilt the floor and seatbox covers out of 16 gauge steel. The floor on the original Patrol is thin metal with areas that allow the accumulation of water, snow and mud. The 16 gauge steel is very sturdy once bolted in. I also replaced all the bolts on the Patrol with grade 8 bolts. It's a overkill but I got a good deal on a lot of them.
Donor Frame


I out boarded the spring mount so I could mount the wider Jeep axles.

New removable crossmember.
Reassembly

The red arrow points to the area of the tub where I took out a big chunk along with the rear bulkhead. This allows a 6'2" person to slide my seat back and sit comfortably.


Built the seat box covers out of 16 guage steel. The seat slider will mount directly to these.


Built this so I could mount the shifters. The original tranny hump (modified) fits over it.

Frame


Engine/powrtrain
The 4.3 Engine is a powerful engine used in various GM vehicles. They are popular and powerful choices for Jeep CJ and FJ40 swaps. The original P engine on the Patrol
was alot thinner than the 4.3. This led to a few problems on my build. The 4.3 wouldn't fit up against the firewall so the engine had to sit forward. This was also necessary
due to the length of the 700R4 transmission. I chose 700R4 for a few reasons. The 700R4 is an overdrive transmission with a low 1st gear. It is a GM transmission so I didn't need an adapter. It is also the last GM transmission that wasn't computer controlled. For now I chose to remove the fuel injection and go with a 4bbl Carb. I can always swap it back but
I wanted to avoid the hassles of trying to get a ECM/computer to work when I really don't know anything about them. For a t-case, I am using the NP231. I found that most of the internals on the Chevy NP231C and the Jeep NP231J are the same within the years. The NP231 comes apart like an egg. So I am using the front half of the NP231C and the back half of a NP231J. This will allow me to mate the T-case to the tranny without an adapter. Using the Jeep half of the tcase will allow me to use the Jeep Wrangler drive shaft for my Jeep axles. The Jeep Tcase also uses a speedo cable and mechanical shifter rather than an electronic speedo control and solenoid controlled shifter. The engine and tranny are both rebuilt so if something doesn't work it's my fault.
I'm using a 20 Gallon Jeep Wrangler Fuel Tank. The rear width of the Patrol is identical to the Jeep Wrangler. This made it easy to install a tank. The tank however has the fuel filler neck on the driver's side rather than the passenger side. It doesn't have an internal fuel pump so I mounted one inside the frame rail above the rear axle.
The frame rail on the Patrol in the front is a few inches narrower than the Wrangler. I ended up outboarding the leafspring mounts rather than modifying the axle. This will allow me to swap in an upgraded Jeep axle in the far future.

This shows the difference in engine sizes.

Driver's side header

I had to direct the drop for the passenger side header toward the front. I was forced to do this due to the narrow width of the Patrol frame and wide V6. The small
space where the collector should have been was blocked by the starter.

I am using a Jeep Wrangler dual master cylinder. This will hook up to my Jeep axles and make me not question myself whenever I apply the brakes.

I removed the clutch pedal since I am going with a automatic transmission. This is the brake pedal I bent to the left as to center it a little better. I kept the clutch pedal in case
I ever decide to switch back to manual.

New aftermarked gas pedal.

I am using a Jeep power steering gear. This is much different than the Patrol gear because it mounts on the inside. I built this adapter out of 1/2 steel plate so I could mount
the steering gear to the frame. The YJ drag ling/drop pitman arm fits like it just came from the factory


I had planned to use a modified Patrol radiator on my build. However I decided to use one that had an internal transmission cooler that was a little more modern. The engine fan
mounted on the 4.3 water pump was in the way so I went with an electric fan controlled by thermo switch. I also have a manual switch on the dash so I can turn the fan off or on if needed. Had to chop off the original mounts and mad a bracket to hold both.


This is the engine bay as it sits today. I built a relay panel to mount the low beam, high beam, fuel pump and engine fan. Also put in an auxillary fuze panel for these items. The rats nest of wires all have a place to go however they are not there yet.

Cabin area

I am using a ProComp 20 circuit wiring harness. I had to draw out the schematic as I ran all the wires.

When I built my first Patrol I used an aftermarket wiring harness however I didn't record all the wiring info. On this build I am making my own electrical schematic. This has already proved valuable. After not working on my Patrol for a few months, I had forgot what I did.

Mounted the fuzepanel in the glove box. I will wrap all the wires with wireloom wrap once I am sure I don't have to add anything.

This is my dash as it sits today. It also looks like a rats nest however all the connectors are ready for hookup. This was one of the most challenging parts of the build. I used POR15 on all my body parts and frame. POR15 is so good that it doesn't allow electrical conductivity between the body pieces. To solve this I had to make sure each piece was properly grounded.

Originally I had made a Nissan/hack job steering column. However I kept having visions of myself launching off some mountain when everything failed. So I swapped out my Nissan hybrid steering column for a generic GM Tilt Column. I'll had to trim off a little of the gauge bezel because it has a larger diameter that the diameter of the stock Patrol column. The steering shaft is also thicker at a one inch diameter. It uses a stock lower shaft from a Jeep Cherokee which attaches with its DD connector the DD connector on my new GM column. the lower shaft mates perfectly to steering gear from a Jeep Cherokee. This combination keeps me from having to weld anything.
Using this column gives me more options. I really want to use the old school Patrol steering wheel. The GM shaft uses 36 splines for the steering wheel. The Patrol shaft (most Datsuns) also uses 36 splines however it is slightly smaller. The stock steering wheel from older Patrol fits snugly on the GM column. It wouldn't work the other way however. If I end up using the Patrol wheel I'll have to make some kind of bezel to make it look like it belongs on the column.
This column comes with an GM electrical connector that connects to my new wiring harness.


I bought this nifty little heater from Vintage Air. It will allow me to cut off the heat and run air. It has variable speeds. Everything is controlled from the switch unit. When the unit is on, air will automatically blow into the defrost vents. The switch will open the little door on the front and blow into the cab. The air can be feathered between both outputs. The waterflow from the radiator is also a controlled by an electric switched valve so the driver can control the defrost or cab air temp. I plan to remove the switches from the black plastic bezel and mount them in the center dash piece. The input and output for the heater core is on the right side of the unit. I found two molded heater lines at Auto Zone that will wrap around the back and out the two original heater hose hole in the Patrol firewall piece.

Heater sitting in the mounting frame.


The heater is faced with a heater bezel from a old series III landrover.

I am using modified seats from my now dead Isuzu trooper. I made seat covers out of multicam nylon cordura
Rollcage and Bullbar
I wanted a 6-point rollcage along with a bullbar/bumper that would withstand a rollover or hitting an antelope. I used 1.75, .120 DOM steel tubing on the cage. It will be tied to the frame.


My bumper is made of thick C-channel.


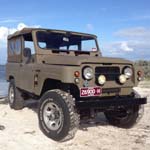
This is my Patrol sitting in my garage today.




 ).
).


